Tools That Delight

13 02 2011

I’ve wanted to to post a review feature on tools for a while, so I decided it’s time to do it! This is the first in a series called “Tools that Delight” and they will be tagged for easy searching in the Categories menu to the right…

As a tool junkie, I mentally rate my tools into different categories depending on how much I want them. It is not unusual for tools to change the category they are in, especially when I learn new techniques:

  • Must Have: these are the tools I can’t work without
  • Gotta Get: these are the ones that I really want, that I will use alot
  • Cool Tool: usually very specific for one unique purpose
  • Next Level Tools: usually really expensive versions of tools I have
  • Big Boys: the tools that are really expensive, or take up alot of room!

First up… the nylon faced bracelet former pliers!

Cool Tool ----> Must Have

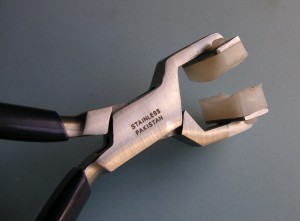
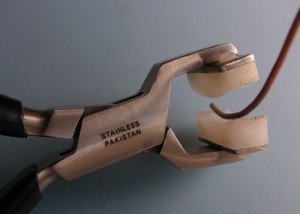
I considered these pliers a “cool tool” for many years, but over the years, they’ve become part of my “must have” toolset (yes – they are still really cool!). These pliers have nylon jaw pads that are shaped to easily bend thin metal and wire in a light consistent curve.

Smiling Jaws!

One side is convex, the other concave, so that they fit together when closed. Many of these pliers have replaceable nylon pads so that when you ding them up (and you will!) you can easily fix them – note the nylon screws that are holding them to the jaws.

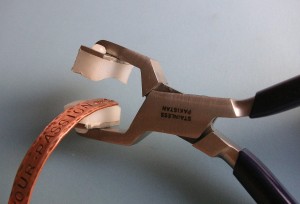
Ready to Shape

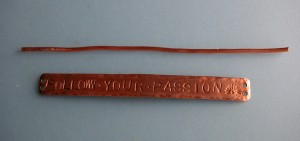
These pliers are great for shaping both narrow strips of metal sheet, as well as wire. I can easily shape up to 12g – for reference, the copper strip above is 16g, and the wire is 14g. And using them is so simple – it doesn’t get any easier!

  • STEP 1: lay wire into nylon jaw
  • STEP 2: close pliers
  • STEP 3: repeat as needed

Shaping Wire

Shaping Wire from a Bend

So simple, and the results are so clean and nice and consistent! You can easily shape wire for a bangle, or to create a “frame” which can be hammered and wrapped.

Shaping Flat Stoc

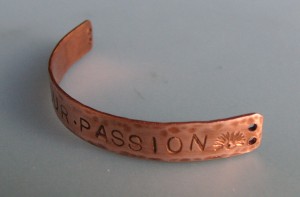
For this piece, I had already finished the copper strip design with some letter stamping, texturing, and hole punching. I am going to use it as a link for a bracelet… look how easily it gets formed!

Curved Metal Strip

Doesn’t this look great?! Nice and even, with no warping or damage, and the nylon ensures that the strip doesn’t get scratched. I am planning on antiquing the copper to bring out the details, and will add some chain, or maybe attach some leather cord, to make up a bracelet.

Hopefully… I’ve shown reason why this pair of pliers has moved into my “Must Have” list – I have a few pairs with slightly different shapes – all of them are well loved!

I’ll be posting more photos of my favorite tools, as well as some info on how they are used – let me know if there’s anything is particular you’re interested in, and I’ll try to oblige!


Amazing Students!

2 08 2010

This weekend I had a really great class – a great fun project, alot of different wire techniques, beautiful beads, and just absolutely wonderful students!  In my class yesterday at Beaded Bliss (one of my favorite places!),the students created such great projects – I decided that this week I would focus on them, instead of me!

We worked in wire from 12g – 22g gauge, and did alot of design planning. To start, we learned first how to twist wire in different gauges, and then how to make perfectly wrapped coils…

Twisted up and Coiled!

Some folks used silver, but some decided to use copper instead, especially folks who were new to wire working. No one wants to spend big $$ on silver when you’re learning new skills, and aren’t sure how it will come out.

Kuchi, Kuchi, koo!

Once we mastered basic coiling and twisting, we learned how to make Kuchi beads from wrapped wire. I’m not sure where the name “Kuchi” comes from, but that’s what I’ve always heard them called.

Antiquing makes it come to life!

Everyone made up a nice selection of coils and Kuchi’s, and then those wanting to antique them, gave their components a bath with Liver of Sulpher (LOS). I love how copper gets such a rich look from the LOS – it changes the wire from “hardware looking” to jewelry grade!

So what was everyone making….? They combined their wire components with  some beautiful lampwork beads, natural stones, and a variety of metal, bone, glass, and ceramic spacers. And they made these beautiful bangles!

Copper Bangle 1

I love how these beads work together – the copper really works with the colors she chose, and the end result is a beautiful bracelet.

Copper Bangle 2

Aren’t these cool beads? The carnelians have some real unusual patterns, and they are balanced with the cool blue beads, and tied together with the cream accents. Another beautiful bracelet.

Copper Bangle 3

The beads and spacers in this bangle really work well together – the group of spacers next to Kuchi show such a wonderful variety of textures – when they are all together, they become a subtle focus.

Silver Bangle 1

This is a great bangle… the blue beads are amazonite, and they look fabulous with the carnelian and bone beads. The silver work is really well done – the very precise Kuchi and tightly wound coils provide a very clean look. The decision to leave this bright (not antiqued) gives is a wonderful light feel.

Silver Bangle 2

This bangle reminds me of the African Savannah! The colors, and the patterns on the lampwork beads – they look great with the antiqued silver wire, and ever time it moves on the wrist, you see something new – what a different look than the first silver bangle!

Silver Bangle 3

I love the neutral palette of this design… the lampwork beads have a very organic feel, and the green aventurine beads accent them really nicely. I like how the darker beads make the rest of the bangle pop

I never forget that students take classes for a number of reasons – they want to be among people who share their passion, they want to learn how to do something, and they hope to walk away with a new skill… and hopefully a great new piece of jewelry!

I was really thrilled with the amazing pieces everyone created, and I think they were too!


An Oldie but Goodie…

7 05 2010

Ok, So Maybe I'm a Little Defensive....

I have this stamped bracelet that I made many, many years ago when I was first starting to do metal work. The original clasp had a small wrapped lampwork bead, which I replaced with a simple hook when the bead eventually broke. I’ve made a lot of cool bracelets since then – wireworked, hand made chains, some with etched copper panels – all sorts. But THIS is the bangle I’ve been wearing 4-5 times a week lately –  I kinda feel a little naked without it.

As a jewelry designer, like other artists and craftspeople, I am always looking to expand my skills and learn new techniques. But this very simple and easy stamped bracelet is like an amulet to me now – it represents my start in metalworking, and I always feel a little creative when I feel it on my wrist.

I’m sure I’ll eventually swap it out for something else, but for now, I’m a little superstitious, and I think I’ll keep it on