I Heart Hearts!

16 01 2011

Valentines day is just a few weeks away, so I figure now is the time to post a tutorial for making a simple wire heart pendant! This is a basic heart, but once you create it, you can embellish it however you want…

You will need basic wire jewelry pliers (chain or bent-nose, round nose, cutters), a small file, a hammer and steel block. You will also need 16g wire and 24g or 26g wire, and a mandrel about 1/2 inch diameter… a fat marker works well.

Preparing the Wire

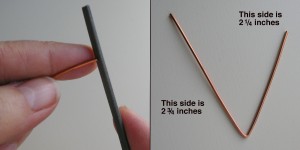
To start…. cut a piece of 16g wire 5 inches long, and file the ends so that they are flush. Then bend the wire using your chain nose pliers, so that one side is 2.25 inches, and the other is 2.75 inches.

Shaping the Heart

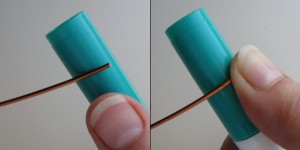
Now use the mandrel (ie: fat marker) to shape the sides of the heart. 16 g wire is a bit difficult to work with, so don’t get discouraged….! Start by holding the wire tightly on the marker, and then rolling (you are pushing – not wrapping!) the wire until you get a nice rounded shape – repeat for each side:


Shaped Heart Sides...

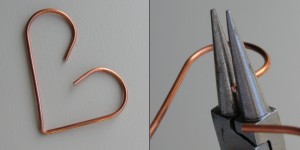
Once the sides are rounded (one side will be longer than the other), it’s time to turn the ends further inward, using the round nose pliers. It is very important to make sure that you don’t pull open the shape you just made on the mandrel! This may take a bit of practice since 16g wire is a bit difficult to work with.


Turning in the Ends

It is more effective to grasp the end of the wire tightly in the round nose pliers, and then PUSH the wire around the pliers, rather than trying to pull the wire, which will warp the shape of the sides and pull them straight.


Shaping the Heart

After you turn in the ends, you can shape the sides by PUSHING the ends toward each other, and gently pushing the sides out a bit, until it is the shape as shown on the right.


Hammering - the Final Shaping Step

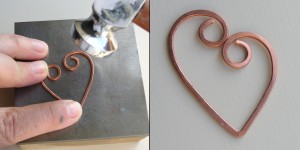
Using a nice slightly rounded hammer and a steel block, flatten the heart frame – the ends may open a bit, and the sides may separate a little… that’s normal, you just need to tighten up the ends and bring the sides back together, as shown above. Next, we will use thin gauge wire to wrap the sides together, so the heart doesn’t open.


Closing the Heart

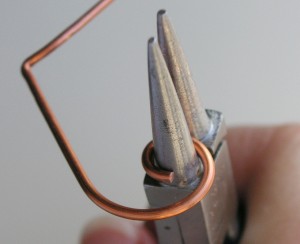
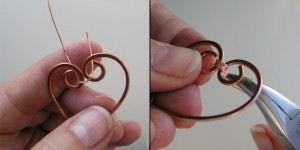
Cut about 4 inches of the thin wire (24g or 26g), and make a small hook at one end, then start to wrap the sides of the heart, as shown above. Wrap the wire through the loops on each side 3-4 times, and pull the wire taut, using your pliers as needed. Decide which side will be the front, and make sure that you pull the wire through, and cut both ends on the back.


The Wraps on the Back

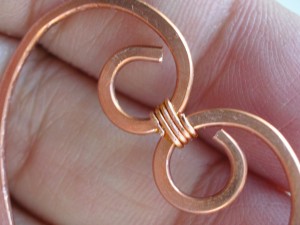
The photo above shows the wraps neatly cut, and pressed down on the back… the only thing left is to add the bail, and hang on a chain.


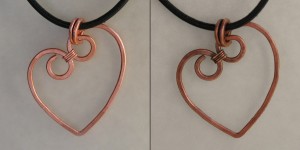
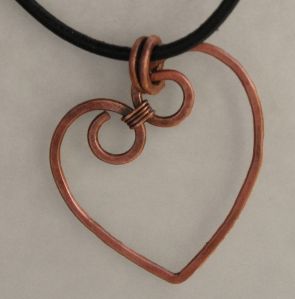
Shiny... or Antiqued - Either Choice is a Winner!

I made a simple bail by wrapping a piece of 16g wire twice on the base round nose pliers, cutting and filing the ends, and hammering it a bit for texture. I then opened it and slipped it thru the loop of the higher side of the heart, so that it hangs balanced. Personally, I’m a fan of the antiqued look! If you have some wire wrapping skills, you may want to embellish the heart with additional wire wrapping, or adding some beads.


Bold Heart!

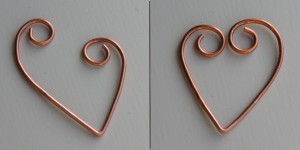
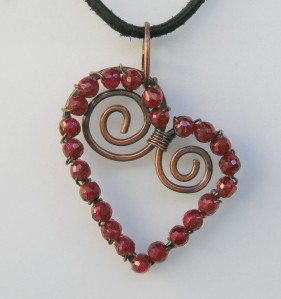
This photo shows a heart frame with spirals (the technique is similar), which is then wrapped with some faceted garnets… this is a class I’ll be teaching locally next month… just in time for Valentines Day!

You may want to check these posts for info on Hammering and on using Liver of Sulpher for Antiquing.


Mistakes Happen

13 12 2010

I enjoy doing custom work – but I hate when I mess it up! A few months ago, I made a simple heart pendant with the name of a friends daughter stamped into the surface. I started in the middle to center the name, and worked outward, but unfortunately, I messed up the next to last letter by stamping it too far away, and not leaving me room for the last letter – so poor “MERCEDES” wound up “ERCEDES” on my first try!

Almost MERCEDES!

I eventually created another one (which came out just fine!), and just threw this into my recycle pile. But I’d much rather reuse, than recycle, so in the back of my mind, I had the idea to rework it with a copper heart, but I wasn’t too sure what to do.

Heart on Heart...

The first thing I realized is that I had to reshape the copper heart to be closer to the shape of the silver one. So I traced the heart, and did a bit of grinding and sanding to make the heart more rounded, like the silver shape.

Shaping My Heart

You can see how I reshaped the bottom to make the sides a bit rounder, and I filed the separation at the top, to exaggerate the shape a little. Once I got the copper done, I needed to do something to the silver, and I decided to do a simple texture using a polished ball pien hammer, working on the back, Once the texture looked good, I laid it on the copper heart, to see how I wanted to proceed.

Two Hearts are Better than One

Not bad…! I really like how the copper base highlights the textured silver, and although I originally thought I’d drill some holes on each side and add jumprings, instead, I think I’ll make a bail in the center. I was also going to rivet the 2 hearts with some brass rod, but I like the solid look of the silver, so I’m going to just solder it up instead.

My Messy Heart!

I did a simple sweat solder join between the 2 pieces by just soldering the back of the silver heart, then laying it over the copper heart, and reheating. Unfortunately, I was concerned that I wasn’t making contact across the whole disk, and I reheated it a bit too much – you can see how the solder flowed out the edges on the sides (sorry I didn’t take a photo before I antiqued it!). I also curved the hearts before soldering them together, so that I didn’t warp the top silver disc, and added a center bail. Then I did a little clean up, oxidized the pendant, and buffed it up with a satin finish.
The Back Counts Too...

When possible, I try to keep the back clean and in the same style as the front – this shows the curve, the patina, and the clean solder of the bail. I only wish the silver heart was as cleanly soldered onto the copper as the bail!

My Heart Belongs to..... Me?

Well… this is not sell quality, but I love the look. So I’m not sure if it’s mine (feels a little strange giving myself a heart!), or if I’ll gift it to a friend. And lucky for me, I’ve got another mis-stamped silver heart in my recycle bin, so I can make another one, which I hope will come out a bit better!!


Getting Hammered…. Again!

4 12 2010

A few months back, I wrote a post about hammering, showing the differences between hammers and mallets (read post HERE). Today’s post is provide more detail about chasing hammers, and the two distinct purposes they have: to “chase” a tool into metal (such as stamping, or repousse work), or, to flatten wire. They are lightweight hammers made with a springy wood, which reduces hand fatigue whed doing repetitive striking. Personally, I like a heavier hammer for stamping, but it is an excellent hammer for repousse (a technique sorta like embossing on thin metal), which requires a lighter touch.

Domed Face vs. Flat Face Chasing Hammers

Chasing hammers are also a great shape/weight for hammering wire… which is how many jewelry artisans use them. The faces come in two different “flavors” – the domed face, and the flat face. In the photo above, you can clearly see how they different as they rest on a steel block… but do you know when to use each one??

Domed Face vs. Flat Face: Hammering Wire

Look at how the hammers are positioned above, on a piece of wire. The domed face hammer (left) strikes the wire with only the center part of the face, but the edges don’t strike the wire at all. The flat face hammer (right) strikes the wire with more surface, but the sharp edge of the hammer can easily mar the wire.

"Not so Pretty" vs. "Pretty Nice"

On the left, you can see the markes made from repeated strikes when the edge of the flat face hammer hits the wire.. On the right, the wire is paddled flat and is mar free – no sharp edges hit the wire when properly using a domed face hammer. In addition, the force is focused at the center, rather than across the entire face, so you have more power when striking.

Tapered Hammered Link

This link is a great example of how useful a domed face hammer is – you can see how it was possible to hammer just the bottom part of the link, to taper the wire on each side, providing an even, gradual change from round to flat. If I tried to use the flat face hammer on this link, it would be very difficult to create this smooth transition. and it would be difficult to avoid hitting the top of the link, where the wire is doubled over.

Round and round we go....

Although I loooove my domed face hammer, and it is my favorite hammer to use with wire, the flat face hammer has it’s place too! In the photo above, you can see how the domed face hammer leaves the surface of Spiral “A” a bit less consistent than the surface of Spiral “B,” which was hit with the flat face. Because the domed face has a curve, the hammer strikes with a bit more force at the exact center, which can leave slight differences in the pressure placed on the surface. A flat face hammer is a good choice when flattening an item that is smaller than it’s face diameter, because the force is displaced evenly across the head.

This week, I decided to start selling my favorite domed face hammer in my Etsy shop. I looked around at the other hammers being offered, and realized that there was no info being posted on using the hammers, which is why I decided to write this post. Hopefully, it will be helpful – for someone new to hammering, a flat face hammer can be very very frustrating, because it is so difficult to obtain mar-free results!


What’s the Hoopla over Hoops??

5 10 2010

Like many women, I loooove hoops! I make quite a few, in different shapes and weights, and although some designs can get a bit complex, the basic “one piece of wire”  hoop style is quite easy to make. It’s been a while since I posted a new tutorial (sorry!), so tonight it’s a “how-to” on making hoops! You’ll need the basic jewelry tools (chain nose pliers, cutters, and round nose pliers), as well as some metal smithing tools (steel block, chasing hammer, and a steel ring mandrel). But if you don’t have all of the metal smithing tools items, you can still practice all the basic steps without hammering…

How to grasp the wire

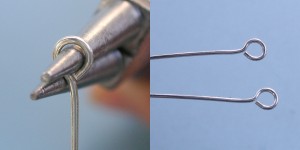
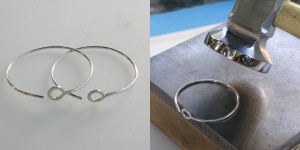
First, we cut 2 pieces of 20g dead soft round wire, each 3 1/4 inch long, and file/sand the ends flus. For reference, I am using sterling silver wire (plated wires may get damaged, but copper works great). Next, we will create a small, centered loop on one end of each wire. Start by grasping the wire between the jaws of the round nose pliers – note how the wire is flush, and doesn’t stick up!

TECHNIQUE TIP: The closer the wire is to the tip of the pliers, the smaller the loop.

Rotate the wire - create the loop

Now, while holding the pliers firm, rotate the wire around one of the jaws to create a loop. If the loop doesn’t close, just reposition it, and pull the wire until you get a nice closed loop. Repeat with the second wire, making sure they look the same.

Centering the loop

Now we need to center the loop over the wire. The easiest way to do this is to grasp the wire with the round nose pliers, so that the wire is hanging down between the jaws, and then gently pushing the wire back, which will reposition the loop and bring it to the center. If the loop opens up, just adjust it a bit…. this takes a little fiddling with, so just be gentle and keep at it until it looks right!

Flatten the loops.... a little bit!

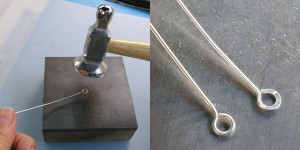
Wire is pretty malleable, and we need to harden the loops up a bit to keep them from opening. An easy way to do this is to lightly hammer them, using a chasing hammer on a steel block. The photo above on the right shows how hammering the loop lightly will flatten the wire, and change it’s appearance a little. The wire on the left has not yet been hammered, so you can see the difference. If needed, close up the loop – hammering will open it up a little.

Shaping the hoops

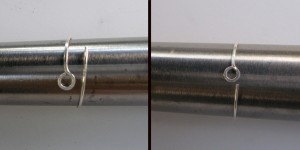
Now comes the part where they actually start to look like earrings! Start by wrapping the wire around a small end of the ring mandrel, and then sliding it down until the ends just meet. This way, the wire hugs the mandrel – if you start out wrapping it at the larger end, the wire springs open a bit, and you may not get the hoop to close. If you don’t have a ring mandrel, you can wrap the wire around anything that is the right size – a fat marker, a bottle top, or a pool cue make good alternatives.

Hardening the hoops

We’re almost done! Lightly hammering the hoops will harden them, so that when we open and close them, they spring back to shape. Make sure to position the loop over the side, and leave about 1/2 inch from each end unhammered. The hoops may get a little out of shape from the hammering – that’s ok – we will get them back in shape!

Finishing them up

The hoops look pretty good, but we need to finish them by making the earring “catch” which fits into the loops to keep them from falling off. Using chain nose pliers (I am using bent chain nose, but any flat pliers will work), bend up the end sharply  – about  1/8 inch.

Final touches

If needed, close up the hoops, and slide them back over the mandrel – this will make them nice and round, and ready to wear. You can easily add additional charms or bead drops (I added some raw faceted citrine bead dangles), and change them to match your outfit.

TECHNIQUE TIP: Hammering the wire is an easy way to harden the wire, which helps to keep it shape. I also like the look of hammered wire. But an alternative is to create the hoops without any hammering, and then throw them in a jewelers tumbler for an hour or so – the tumbling will harden the wires, so that they have a springiness to them.

Have fun…!


Getting Hammered

24 06 2010

Hammers vs. mallets – which one to use?? Well, the answer is obvious… use them both! So the better question then, is which one to choose, and why. They are shaped similar to each other, and both of them are used in a similar fashion, but they produce very different results.

Rawhide Mallet on the top, Chasing Hammer on the bottom

Mallets come in a variety of materials – plastic, nylon, rubber, wood, and my favorite… rawhide.  They all have one major characteristic in common – they are made of a softer material than whatever they are striking. Hammers though, are made of steel, or some other material  that is harder than what they are striking.

Hit with a mallet (top), vs. hit with a hammer (bottom)

Whether you use a mallet, or use a hammer, both of these  will work harden your  item. Because it is softer than the material being hit, the mallet will absorb the force, and won’t affect the surface or altering the material. Since a hammer is harder than the material you are working with, it will cause the material to expand and flatten, as long as you are on a steel block or anvil.

An unworked ring, hit with a mallet, and hammered

I cut a few rings to show the results of hitting with a mallet, vs. hitting with a hammer – you can see how the mallet moved the metal just a little (see how the ring opened just a tiny bit), but the wire is still round, whereas the hammered ring has flattened out and expanded.

And the rings... all closed up

I love the look of hammered wire, but there are times when my design looks better without the flattening or texture, so it’s useful to know how to use each tool.