I Heart Hearts!

16 01 2011

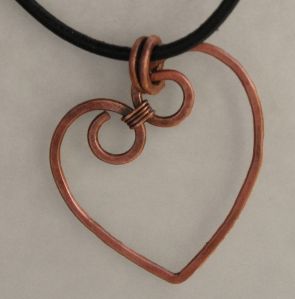
Valentines day is just a few weeks away, so I figure now is the time to post a tutorial for making a simple wire heart pendant! This is a basic heart, but once you create it, you can embellish it however you want…

You will need basic wire jewelry pliers (chain or bent-nose, round nose, cutters), a small file, a hammer and steel block. You will also need 16g wire and 24g or 26g wire, and a mandrel about 1/2 inch diameter… a fat marker works well.

Preparing the Wire

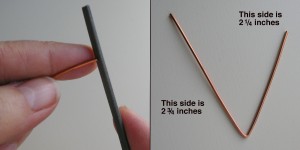
To start…. cut a piece of 16g wire 5 inches long, and file the ends so that they are flush. Then bend the wire using your chain nose pliers, so that one side is 2.25 inches, and the other is 2.75 inches.

Shaping the Heart

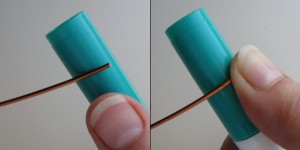
Now use the mandrel (ie: fat marker) to shape the sides of the heart. 16 g wire is a bit difficult to work with, so don’t get discouraged….! Start by holding the wire tightly on the marker, and then rolling (you are pushing – not wrapping!) the wire until you get a nice rounded shape – repeat for each side:


Shaped Heart Sides...

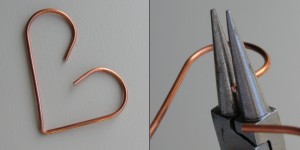
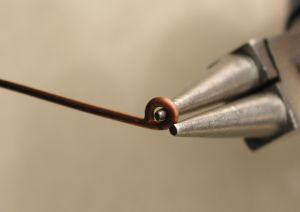
Once the sides are rounded (one side will be longer than the other), it’s time to turn the ends further inward, using the round nose pliers. It is very important to make sure that you don’t pull open the shape you just made on the mandrel! This may take a bit of practice since 16g wire is a bit difficult to work with.


Turning in the Ends

It is more effective to grasp the end of the wire tightly in the round nose pliers, and then PUSH the wire around the pliers, rather than trying to pull the wire, which will warp the shape of the sides and pull them straight.


Shaping the Heart

After you turn in the ends, you can shape the sides by PUSHING the ends toward each other, and gently pushing the sides out a bit, until it is the shape as shown on the right.


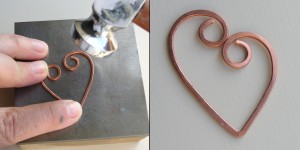
Hammering - the Final Shaping Step

Using a nice slightly rounded hammer and a steel block, flatten the heart frame – the ends may open a bit, and the sides may separate a little… that’s normal, you just need to tighten up the ends and bring the sides back together, as shown above. Next, we will use thin gauge wire to wrap the sides together, so the heart doesn’t open.


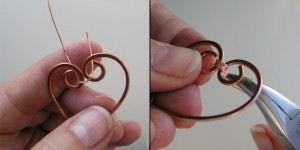
Closing the Heart

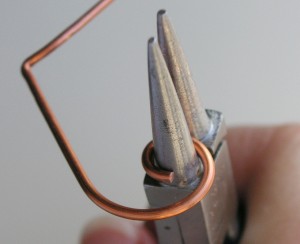
Cut about 4 inches of the thin wire (24g or 26g), and make a small hook at one end, then start to wrap the sides of the heart, as shown above. Wrap the wire through the loops on each side 3-4 times, and pull the wire taut, using your pliers as needed. Decide which side will be the front, and make sure that you pull the wire through, and cut both ends on the back.


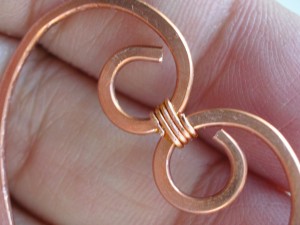
The Wraps on the Back

The photo above shows the wraps neatly cut, and pressed down on the back… the only thing left is to add the bail, and hang on a chain.


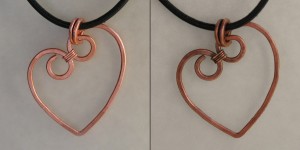
Shiny... or Antiqued - Either Choice is a Winner!

I made a simple bail by wrapping a piece of 16g wire twice on the base round nose pliers, cutting and filing the ends, and hammering it a bit for texture. I then opened it and slipped it thru the loop of the higher side of the heart, so that it hangs balanced. Personally, I’m a fan of the antiqued look! If you have some wire wrapping skills, you may want to embellish the heart with additional wire wrapping, or adding some beads.


Bold Heart!

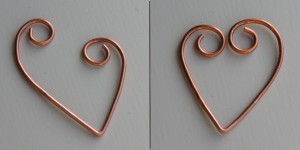
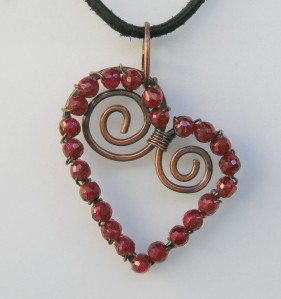
This photo shows a heart frame with spirals (the technique is similar), which is then wrapped with some faceted garnets… this is a class I’ll be teaching locally next month… just in time for Valentines Day!

You may want to check these posts for info on Hammering and on using Liver of Sulpher for Antiquing.


Oxidizing With LOS

22 11 2010

If you like to create mixed metal jewelry like I do, you’ll soon discover that oxidizing the pieces really give them some depth and enhance the texture. Last week I got an order for a a bangle bracelet that a customer liked, but needed made smaller, so I figured it would be a good time to write up a tutorial on how to use liver of sulpher (LOS) for oxidizing. LOS is great for creating an antiqued look on copper and silver  – it works on brass too, but has a weaker affect.
One Oxidized, One Shiny!

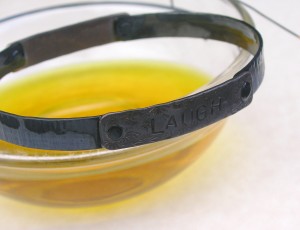
Here is the original bangle, oxidized and “aged” to a beautiful warm patina, shown with the “brand spaking new” bangle I just finished. You can clearly see the difference in the finish – the oxidized bangle (top) has the detailed texture and stamping highlighted, whereas the new one I made doesn’t show the depth.

In Rock Form

I use the solid LOS – I’ve been using it for years, and I’m pretty used to it, but you can also buy liquid form and gel form, which is easier to use, but has a shorter life span. Solid LOS comes in rocks, and the container is cloudy to protect from direct light. It is very, very, very important to keep LOS stored in a way to keep moisture from getting into the container – moisture will make LOS useless. I always tighten my container, put it in a ziplock bag, and place that into a brown bag – protecting it from light, and moisture. To use, I take a small rock, and put it into a glass bowl, then add very hot water.

Dissolved...

Make sure not to use a metal bowl or it will contaminate the solution, and mess up the bowl too!  The LOS will dissolve in the hot water, becoming a greenish yellow color. Please note – LOS is a chemical – it STINKS like sulpher (duh…), and some folks are sensitive to it. I don’t have any issues, but I try to keep it off my skin, and use a piece of copper wire as a hook to dip items into the LOS.

Like Magic!

I just drop the bangle in, and very quickly, the bangle turns black. It only takes a few seconds (really!) to completely change the copper and silver. I always make sure that I use a copper hook, so I don’t need to fish it out with my fingers!

...And 10 Seconds Later...!

Once I get the coverage I want, I remove the piece and rinse it in cold water. You want to be sure that you don’t leave it in the LOS too long, because if you “over” oxidize, the black will actually solidify, and flake off. The LOS will continue to work in heat, so it is important to rinse in cold water, and dry completely.

Yuck!!

You can really see how black it gets when you compare the bangles! It’s hard to believe, but in just 15 minutes, these bangles will look like twins! But to get there, we need to get down and dirty…

Take it off, take it off, take it all off!!

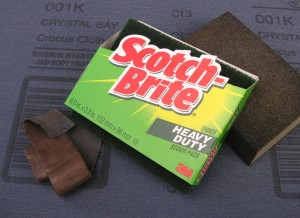
There are several different ways to remove the excess surface black. Basically, you need to gently scratch it off, to expose the surface underneath. These are the three products I used for this bangle: 3M Scotch-Bright green scrubbies (for some reson, generic scrubbies just don’t work!), a fine sanding sponge block (you can get these from the hardware store), and 3M Crocus Cloth, which I get from jewelry suppliers. First I use the green scrubbie  and rub it over the surface, getting as much black off as I can. The sanding block can be a bit scratchy on the surface, so make sure to practice using this on scrap metal to get used to it. I also use the green scrubbie to get the inside cleaned up, and then I use a strip of the crocus cloth to buff it up and soften any scratches. Crocus cloth is a denim material with a fine sandpaper paint on one side. It will dissolve and make a big mess if it gets wet, so make sure your piece is dry.

Just like the other one!

And here’s the final “twin bangles” – the original is on the bottom (you can see the word “DREAM” on the inside back), and the new one is up top. It is still a little bright – it will take a few days for the copper “pink” to age and take on a beautiful warm color. I will rub a little oil onto the surface, which protects the piece a bit, and adds to the patina. Over time, the new owner will need to occasionally rub  the piece clean with a green scrubbie, because the copper will continue to oxidize naturally.

I rarely make 2 items like this EXACTLY the same. I usually stamp a different phrase or texture, so this was a great chance to compare all the steps in the process with the final bangle. I hope this helped to show folks that using LOS is pretty easy, and the results are great!


What’s the Hoopla over Hoops??

5 10 2010

Like many women, I loooove hoops! I make quite a few, in different shapes and weights, and although some designs can get a bit complex, the basic “one piece of wire”  hoop style is quite easy to make. It’s been a while since I posted a new tutorial (sorry!), so tonight it’s a “how-to” on making hoops! You’ll need the basic jewelry tools (chain nose pliers, cutters, and round nose pliers), as well as some metal smithing tools (steel block, chasing hammer, and a steel ring mandrel). But if you don’t have all of the metal smithing tools items, you can still practice all the basic steps without hammering…

How to grasp the wire

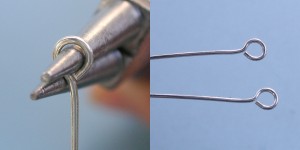
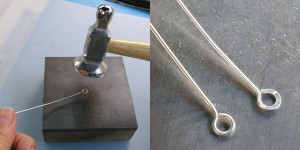
First, we cut 2 pieces of 20g dead soft round wire, each 3 1/4 inch long, and file/sand the ends flus. For reference, I am using sterling silver wire (plated wires may get damaged, but copper works great). Next, we will create a small, centered loop on one end of each wire. Start by grasping the wire between the jaws of the round nose pliers – note how the wire is flush, and doesn’t stick up!

TECHNIQUE TIP: The closer the wire is to the tip of the pliers, the smaller the loop.

Rotate the wire - create the loop

Now, while holding the pliers firm, rotate the wire around one of the jaws to create a loop. If the loop doesn’t close, just reposition it, and pull the wire until you get a nice closed loop. Repeat with the second wire, making sure they look the same.

Centering the loop

Now we need to center the loop over the wire. The easiest way to do this is to grasp the wire with the round nose pliers, so that the wire is hanging down between the jaws, and then gently pushing the wire back, which will reposition the loop and bring it to the center. If the loop opens up, just adjust it a bit…. this takes a little fiddling with, so just be gentle and keep at it until it looks right!

Flatten the loops.... a little bit!

Wire is pretty malleable, and we need to harden the loops up a bit to keep them from opening. An easy way to do this is to lightly hammer them, using a chasing hammer on a steel block. The photo above on the right shows how hammering the loop lightly will flatten the wire, and change it’s appearance a little. The wire on the left has not yet been hammered, so you can see the difference. If needed, close up the loop – hammering will open it up a little.
Shaping the hoops

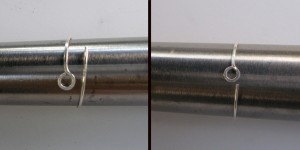
Now comes the part where they actually start to look like earrings! Start by wrapping the wire around a small end of the ring mandrel, and then sliding it down until the ends just meet. This way, the wire hugs the mandrel – if you start out wrapping it at the larger end, the wire springs open a bit, and you may not get the hoop to close. If you don’t have a ring mandrel, you can wrap the wire around anything that is the right size – a fat marker, a bottle top, or a pool cue make good alternatives.

Hardening the hoops

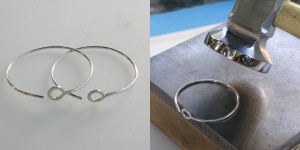
We’re almost done! Lightly hammering the hoops will harden them, so that when we open and close them, they spring back to shape. Make sure to position the loop over the side, and leave about 1/2 inch from each end unhammered. The hoops may get a little out of shape from the hammering – that’s ok – we will get them back in shape!

Finishing them up

The hoops look pretty good, but we need to finish them by making the earring “catch” which fits into the loops to keep them from falling off. Using chain nose pliers (I am using bent chain nose, but any flat pliers will work), bend up the end sharply  – about  1/8 inch.

Final touches

If needed, close up the hoops, and slide them back over the mandrel – this will make them nice and round, and ready to wear. You can easily add additional charms or bead drops (I added some raw faceted citrine bead dangles), and change them to match your outfit.

TECHNIQUE TIP: Hammering the wire is an easy way to harden the wire, which helps to keep it shape. I also like the look of hammered wire. But an alternative is to create the hoops without any hammering, and then throw them in a jewelers tumbler for an hour or so – the tumbling will harden the wires, so that they have a springiness to them.

Have fun…!


Getting Hooked (or, How to Make a Clasp)

26 07 2010

Being able to make your own jewelry findings means that you can always create what you need, in the size you need. I love finishing off a handmade piece with a well made clasp, and one of my favorites is the basic wire hook.

Step 1: flatten one end

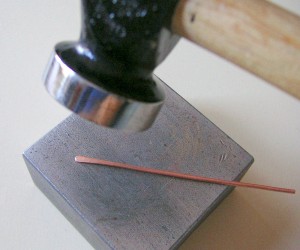
I start with a 2.5 inch length of wire, in a pretty heavy weight. I’m using 16g here, but you can change up the gauge and the length to customize your clasp. Sand or file the ends clean, and hammer one end to create a “paddle” shape.

Step 2: create a small loop

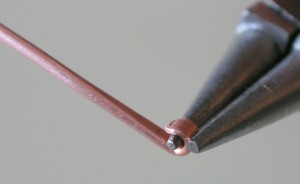
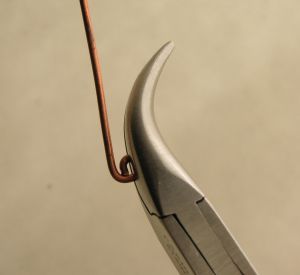
Next, you need to create a small loop (as small as possible) at the flattened end, using the very tip of my round nose pliers.  Make sure you don’t use good precision round nose pliers – the heavier gauge wires could twist the tips out of alignment and ruin your pliers!

Step 3: make a large loop

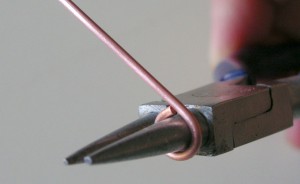
On the other end of the wire, make a larger loop, using the base of your round nose pliers. Make sure that the loops are facing the same direction, as shown below:

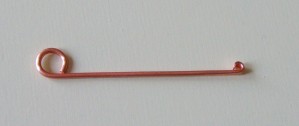
The wire is now ready to be shaped

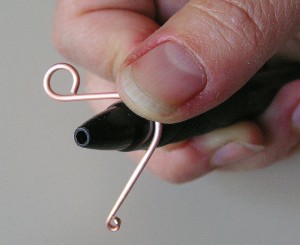
The loops are round, facing the same direction. The wire is nice and straight, and  can now be shaped around a mandrel into a hook (I use a pen in the following steps, but you can use any appropriately shaped rod as a mandrel).

Step 4: holding the wire

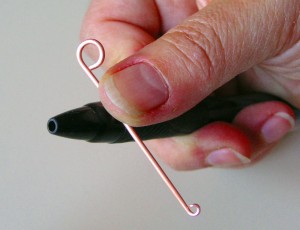
Hold the wire across the top of the pen, with both of the loops facing up. Position your thumb a bit closer to the large loop, and hold the wire tight on the mandrel.

Step 5: bending the wire

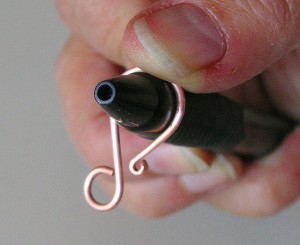
Start bending the wire over the mandrel on both sides – the end with the small loop will be longer. Bend the wire gently, ensuring it keeps a rounded shape.

Step 6: shaping the hook

Once both sides are pushed down (like an upside down “U”), push the longer end with the small loop under the mandrel, toward the large loop. This gives the clasp a “swoop” shape, which helps with the integrity of the hook.

Step 7: the finishing touches

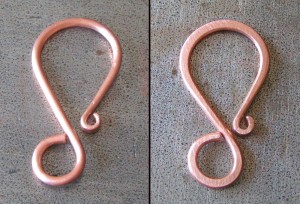
Now the hook is done. The final step is to harden the wire, so that the clasp will not bend out when used. You can either whack it with a mallet, which will keep the wire round (as shown on the left), or you can lightly hammer the wire on the curves, which will result in a clasp as shown on the right. If the curves open up a little, just reshape them closed. And don’t forget to antique your clasp to match your chain and metal components if needed.

Practice a few in copper before working with silver, and adjust the wire gauge and length to create variations that suit your designs and style. You  will never be “held hostage” to store bought components again!


Do it Again, and Again, and Again – Perfect Spirals!!

15 06 2010

When I first started making jewelry, I wondered if I would ever be able to make clean and consistent  spirals – it seemed that whenever I finally got one  to look good, I could never duplicate it! So I started making up wire templates, complete with gauge of wire and length, so that once I learned to make spirals, I could recreate them over and over…

A small starting loop makes a tight spiral

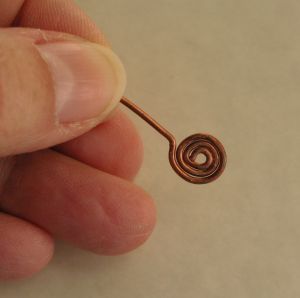
First, I cut a piece of wire 3 inches (this is 18g wire, for reference), and make a very small loop at one end using round nose pliers.

Holding the loop at the base of the pliars

Next, I hold the loop in flat nose pliers (I am using bent-nose pliers, but you can use any flat pliers). I am holding the wire straight out, near to the base of the pliers, not at the tip, so that I can get a good grip on the loop.

Push the wire up, and press it close to loop...

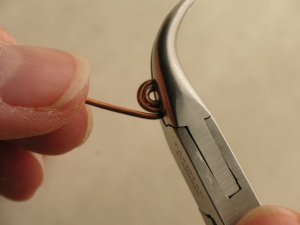
Holding the loop tight in the pliers (note how you can see part of the loop sticking out), now I bend the wire straight up, wrapping it along side the loop.

The spiral starts to take shape as you continue wrapping

I reposition the loop in the pliers, and repeat, until the spiral is the size I want. I measure the wire left over from the spiral, and subtract it from the 3 inches I started with, to get the length of wire I used for the spiral.

All wound up - spiral complete!

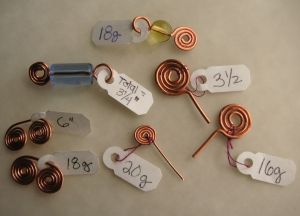
I do this with different gauges of wire, and then mark the sample items with the both the measure and the gauge. This way I can just pull out a spiral, and duplicate it by using the same wires.

Selection of wire spiral templates

Making templates is easy, and saves me alot of time, effort and wasted wire.  I make up examples in copper wire for links, clasps, earwires, and loops too, and store them in little ziplock bags. If you make wire jewelry, consider making up some sample wire templates –  you’ll always have real examples of all different kinds of wire components easily available.


How the Leather Ends…?

29 05 2010

I love making pendants…. wire wrapped, metalsmithed, riveted and etched – I just love ’em! And hanging them from leather cords is my favorite way to wear them. There are many different techniques for ending leather cord – here’s one of my favorite ways, which gives me loops on the ends, so I can add a big wired hook:

The Start....

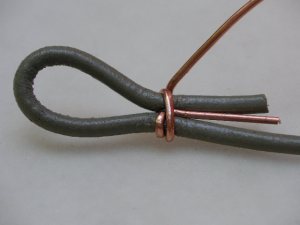
The first thing you do is make a loop in a piece of wire, and then bend the loop 90° to the stem of the wire (for reference, this is 20g wire, and 2mm leather). Then lay the end of the cord into the wire loop, and fold the tip of the cord back to make a loop in the cord. Keep the stem of the wire parallel to the cord, and make sure that the cord loop is sized for your project, since it is not adjustable! Then, wrap the wire around the cording (and the stem of the wire), making the wraps go DOWN the cord (don’t wrap the wire up the cord loop!), keeping the wire smooth.

And The Finish...

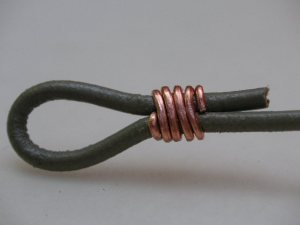
Continue wrapping the wire, keeping it smooth and taut – try not to have any gaps between the wire wraps. If you do have gaps, squeeze them together gently with chain nose pliers. Make 4-5 full wraps with the wire, and cut it flush as it aligns to the center. Press it close to the cord if needed, being careful not to mar the wraps. Cut the center wire stem, lightly file the ends as needed, and cut the leather tail close to the wrap, if you like.

Some Tips: If you have trouble, practice using 22 gauge wire. If you have gaps when wrapping the wire, pull the wire lightly toward the loop as you bring it around the cord,. If your wraps aren’t tight, then the cord can pull loose – try pulling the wire up taut, then pull tight around the cord.


“Will Write Tutorial For Tools….”

5 05 2010

Fun with Forming Block!!

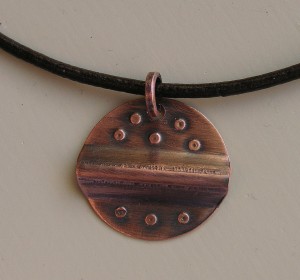
Last month, I was thrilled to be selected as a “tools for tutorial” match… basically, a great vendor on Etsy who sells tools (Evie’s Tool Emporium) was looking for someone to show folks how to use one of their new tools by writing up a brief tutorial. A wonderful blog called Totally Tutorials acts as the go-between, and I am pleased to now post this “Simple Formed Pendant” tutorial using a very cool metal mini-forming steel block. I tried to keep the project simple so that if you are unfamiliar with metalworking, you’ll find this to be a fun to make, but even experienced metalsmiths will enjoy using the forming block, and adding this technique to their skillset.

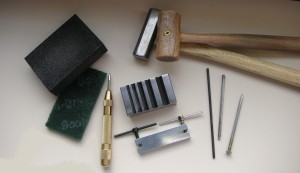
Project Tools

These are the tools I used: sponge block and green scrubbie (to clean the disc), a spring-loaded center punch, the forming block, a twist hole punch, a hammer and a mallet, and some punches (shown are a transfer punch, a nail, and a doming punch). You will also need a metal disc for the pendant – for this project I am using a 15/16 inch diameter circle in 24g copper. Please note that 24g – 26g works well with this tool!

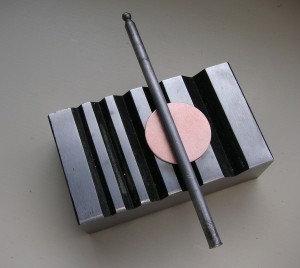
Pendent Disc on Forming Block

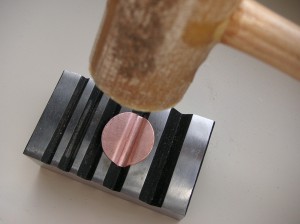
Clean the disc with the sanding block or green scrubbie, and place it over one of the valleys in the forming block, laying a punch over it. I am using a doming punch, but if you don’t have one, you can use a regular steel nail, as long as it fits easily into the valley.

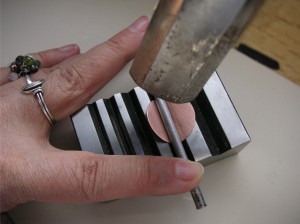
Hammering a Fold into the Disc

Hold the punch firmly in place, and hammer it on the disc, into the valley, forming the metal (repeat to get a good crease).

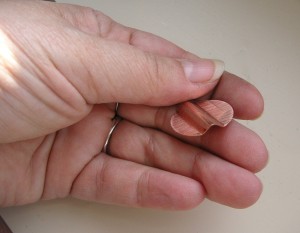
Flattening the Disc Edges

Remove the punch, and flatten the disc edges using a wood or rawhide mallet. If you don’t have a mallet, lay a piece of leather over the disc, and use the hammer.

Formed Disc - See How Easy!!

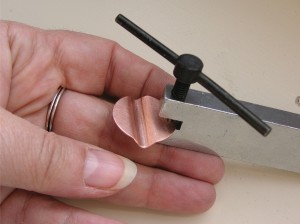
Making the Hole for the Bail

Make a hole in the disc using a twist hole puncher or a drill. If you don’t have a hole puncher of a drill, you can lay the disc on a block of wood, and hammer a sharp nail into the disc. This can cause the disc to warp, so you will need to flatten it out.

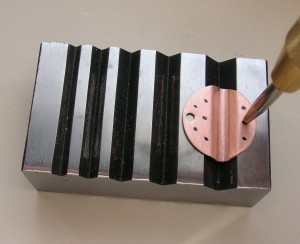
Adding some Texture

Lay the disc onto the forming block, laying the crease into a valley, as shown. Use the center punch to create a pattern (you can mark the pattern on the disc with a Sharpie, like I did). I like to file the tip of my punch, and punch on the BACK, so that the pattern is in relief on the front, but you can create a pattern however you like! If you don’t have a spring-loaded center punch, you can hammer the pattern with a regular center punch or nail

Adding the Finishing Touches

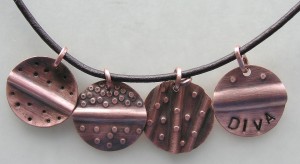
Add a bail (I used a simple jumpring), and antique/buff to highlight the details, and voila! You have a cool metal formed pendant!

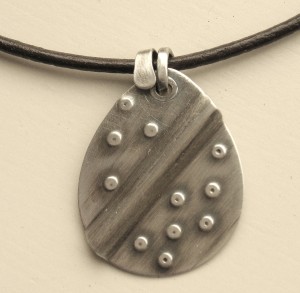
Another Pendent - This One in Silver

After I made a few in copper, I decided to make one in silver, using the same basic steps. You can also add some other techniques, such as stamping in a word or design, or adding some beads or dangles. It takes a little practice, but just have fun with it!


Ear Wires Anyone??

24 04 2010

I am a hard core tool junkie… it’s hard for me to imagine any jewelry making tool that I wouldn’t want to own! Hammers, and pliers, and drill bits, oh my! But a few years ago, I started seeing some new jigs in magazines that were specifically made for creating ear wires, and couldn’t help thinking…. WHY???

Creating ear wires is easy, needs no special tools, and is a skill that anyone making jewelry should be able to do. I have a one page handout that I made for my students, but you don’t need to take a class with me – I’m posting the “how-to” right here!

STEP 1: Cut a piece of 20g wire between 1.5- 2 inches. File both ends of the wire, and make a single loop on one side. You should always make pairs together, one step at a time, so they are consistent.

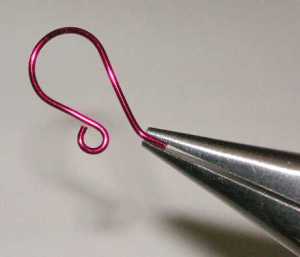
STEP 2: Using a pen as a mandrel (the “ridged” type pen works very nicely), bend the wire around the pen – keep the loop as shown, don’t let the loop turn to the side. Pull both sides of wire down around the pen barrel, then PUSH the loop under the barrel until ear wire shape is seen. Pushing the loop under the pen gives you a “swoop” in the wire.

STEP 3: For a nice professional touch, use pliers to create slight bend at the end of the wire. Hammer the curves, or tumble to harden.

Have fun, and experiment! You can make larger ear wires by cutting longer wire, and using a pen with a larger barrel than shown. Once you get the hang of it, you’ll bee creating all different wonderful styles to go with your designs.