Mistakes Happen

13 12 2010

I enjoy doing custom work – but I hate when I mess it up! A few months ago, I made a simple heart pendant with the name of a friends daughter stamped into the surface. I started in the middle to center the name, and worked outward, but unfortunately, I messed up the next to last letter by stamping it too far away, and not leaving me room for the last letter – so poor “MERCEDES” wound up “ERCEDES” on my first try!

Almost MERCEDES!

I eventually created another one (which came out just fine!), and just threw this into my recycle pile. But I’d much rather reuse, than recycle, so in the back of my mind, I had the idea to rework it with a copper heart, but I wasn’t too sure what to do.

Heart on Heart...

The first thing I realized is that I had to reshape the copper heart to be closer to the shape of the silver one. So I traced the heart, and did a bit of grinding and sanding to make the heart more rounded, like the silver shape.

Shaping My Heart

You can see how I reshaped the bottom to make the sides a bit rounder, and I filed the separation at the top, to exaggerate the shape a little. Once I got the copper done, I needed to do something to the silver, and I decided to do a simple texture using a polished ball pien hammer, working on the back, Once the texture looked good, I laid it on the copper heart, to see how I wanted to proceed.

Two Hearts are Better than One

Not bad…! I really like how the copper base highlights the textured silver, and although I originally thought I’d drill some holes on each side and add jumprings, instead, I think I’ll make a bail in the center. I was also going to rivet the 2 hearts with some brass rod, but I like the solid look of the silver, so I’m going to just solder it up instead.

My Messy Heart!

I did a simple sweat solder join between the 2 pieces by just soldering the back of the silver heart, then laying it over the copper heart, and reheating. Unfortunately, I was concerned that I wasn’t making contact across the whole disk, and I reheated it a bit too much – you can see how the solder flowed out the edges on the sides (sorry I didn’t take a photo before I antiqued it!). I also curved the hearts before soldering them together, so that I didn’t warp the top silver disc, and added a center bail. Then I did a little clean up, oxidized the pendant, and buffed it up with a satin finish.

The Back Counts Too...

When possible, I try to keep the back clean and in the same style as the front – this shows the curve, the patina, and the clean solder of the bail. I only wish the silver heart was as cleanly soldered onto the copper as the bail!

My Heart Belongs to..... Me?

Well… this is not sell quality, but I love the look. So I’m not sure if it’s mine (feels a little strange giving myself a heart!), or if I’ll gift it to a friend. And lucky for me, I’ve got another mis-stamped silver heart in my recycle bin, so I can make another one, which I hope will come out a bit better!!


Oxidizing With LOS

22 11 2010

If you like to create mixed metal jewelry like I do, you’ll soon discover that oxidizing the pieces really give them some depth and enhance the texture. Last week I got an order for a a bangle bracelet that a customer liked, but needed made smaller, so I figured it would be a good time to write up a tutorial on how to use liver of sulpher (LOS) for oxidizing. LOS is great for creating an antiqued look on copper and silver  – it works on brass too, but has a weaker affect.

One Oxidized, One Shiny!

Here is the original bangle, oxidized and “aged” to a beautiful warm patina, shown with the “brand spaking new” bangle I just finished. You can clearly see the difference in the finish – the oxidized bangle (top) has the detailed texture and stamping highlighted, whereas the new one I made doesn’t show the depth.

In Rock Form

I use the solid LOS – I’ve been using it for years, and I’m pretty used to it, but you can also buy liquid form and gel form, which is easier to use, but has a shorter life span. Solid LOS comes in rocks, and the container is cloudy to protect from direct light. It is very, very, very important to keep LOS stored in a way to keep moisture from getting into the container – moisture will make LOS useless. I always tighten my container, put it in a ziplock bag, and place that into a brown bag – protecting it from light, and moisture. To use, I take a small rock, and put it into a glass bowl, then add very hot water.

Dissolved...

Make sure not to use a metal bowl or it will contaminate the solution, and mess up the bowl too!  The LOS will dissolve in the hot water, becoming a greenish yellow color. Please note – LOS is a chemical – it STINKS like sulpher (duh…), and some folks are sensitive to it. I don’t have any issues, but I try to keep it off my skin, and use a piece of copper wire as a hook to dip items into the LOS.

Like Magic!

I just drop the bangle in, and very quickly, the bangle turns black. It only takes a few seconds (really!) to completely change the copper and silver. I always make sure that I use a copper hook, so I don’t need to fish it out with my fingers!

...And 10 Seconds Later...!

Once I get the coverage I want, I remove the piece and rinse it in cold water. You want to be sure that you don’t leave it in the LOS too long, because if you “over” oxidize, the black will actually solidify, and flake off. The LOS will continue to work in heat, so it is important to rinse in cold water, and dry completely.

Yuck!!
You can really see how black it gets when you compare the bangles! It’s hard to believe, but in just 15 minutes, these bangles will look like twins! But to get there, we need to get down and dirty…
Take it off, take it off, take it all off!!

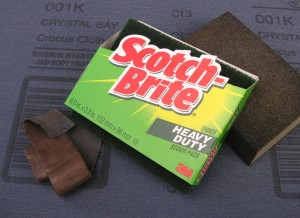
There are several different ways to remove the excess surface black. Basically, you need to gently scratch it off, to expose the surface underneath. These are the three products I used for this bangle: 3M Scotch-Bright green scrubbies (for some reson, generic scrubbies just don’t work!), a fine sanding sponge block (you can get these from the hardware store), and 3M Crocus Cloth, which I get from jewelry suppliers. First I use the green scrubbie  and rub it over the surface, getting as much black off as I can. The sanding block can be a bit scratchy on the surface, so make sure to practice using this on scrap metal to get used to it. I also use the green scrubbie to get the inside cleaned up, and then I use a strip of the crocus cloth to buff it up and soften any scratches. Crocus cloth is a denim material with a fine sandpaper paint on one side. It will dissolve and make a big mess if it gets wet, so make sure your piece is dry.

Just like the other one!

And here’s the final “twin bangles” – the original is on the bottom (you can see the word “DREAM” on the inside back), and the new one is up top. It is still a little bright – it will take a few days for the copper “pink” to age and take on a beautiful warm color. I will rub a little oil onto the surface, which protects the piece a bit, and adds to the patina. Over time, the new owner will need to occasionally rub  the piece clean with a green scrubbie, because the copper will continue to oxidize naturally.

I rarely make 2 items like this EXACTLY the same. I usually stamp a different phrase or texture, so this was a great chance to compare all the steps in the process with the final bangle. I hope this helped to show folks that using LOS is pretty easy, and the results are great!


What’s the Hoopla over Hoops??

5 10 2010

Like many women, I loooove hoops! I make quite a few, in different shapes and weights, and although some designs can get a bit complex, the basic “one piece of wire”  hoop style is quite easy to make. It’s been a while since I posted a new tutorial (sorry!), so tonight it’s a “how-to” on making hoops! You’ll need the basic jewelry tools (chain nose pliers, cutters, and round nose pliers), as well as some metal smithing tools (steel block, chasing hammer, and a steel ring mandrel). But if you don’t have all of the metal smithing tools items, you can still practice all the basic steps without hammering…

How to grasp the wire

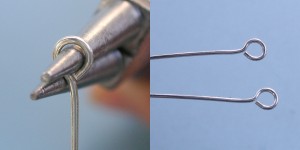
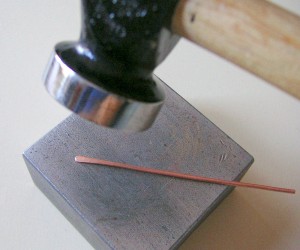
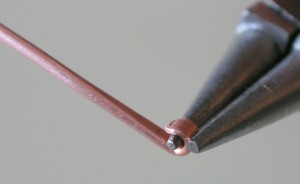
First, we cut 2 pieces of 20g dead soft round wire, each 3 1/4 inch long, and file/sand the ends flus. For reference, I am using sterling silver wire (plated wires may get damaged, but copper works great). Next, we will create a small, centered loop on one end of each wire. Start by grasping the wire between the jaws of the round nose pliers – note how the wire is flush, and doesn’t stick up!

TECHNIQUE TIP: The closer the wire is to the tip of the pliers, the smaller the loop.

Rotate the wire - create the loop

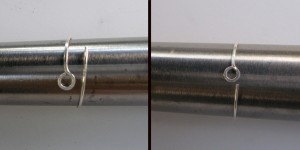
Now, while holding the pliers firm, rotate the wire around one of the jaws to create a loop. If the loop doesn’t close, just reposition it, and pull the wire until you get a nice closed loop. Repeat with the second wire, making sure they look the same.

Centering the loop

Now we need to center the loop over the wire. The easiest way to do this is to grasp the wire with the round nose pliers, so that the wire is hanging down between the jaws, and then gently pushing the wire back, which will reposition the loop and bring it to the center. If the loop opens up, just adjust it a bit…. this takes a little fiddling with, so just be gentle and keep at it until it looks right!

Flatten the loops.... a little bit!

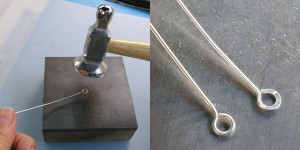
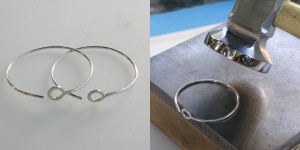
Wire is pretty malleable, and we need to harden the loops up a bit to keep them from opening. An easy way to do this is to lightly hammer them, using a chasing hammer on a steel block. The photo above on the right shows how hammering the loop lightly will flatten the wire, and change it’s appearance a little. The wire on the left has not yet been hammered, so you can see the difference. If needed, close up the loop – hammering will open it up a little.

Shaping the hoops

Now comes the part where they actually start to look like earrings! Start by wrapping the wire around a small end of the ring mandrel, and then sliding it down until the ends just meet. This way, the wire hugs the mandrel – if you start out wrapping it at the larger end, the wire springs open a bit, and you may not get the hoop to close. If you don’t have a ring mandrel, you can wrap the wire around anything that is the right size – a fat marker, a bottle top, or a pool cue make good alternatives.

Hardening the hoops

We’re almost done! Lightly hammering the hoops will harden them, so that when we open and close them, they spring back to shape. Make sure to position the loop over the side, and leave about 1/2 inch from each end unhammered. The hoops may get a little out of shape from the hammering – that’s ok – we will get them back in shape!

Finishing them up

The hoops look pretty good, but we need to finish them by making the earring “catch” which fits into the loops to keep them from falling off. Using chain nose pliers (I am using bent chain nose, but any flat pliers will work), bend up the end sharply  – about  1/8 inch.

Final touches

If needed, close up the hoops, and slide them back over the mandrel – this will make them nice and round, and ready to wear. You can easily add additional charms or bead drops (I added some raw faceted citrine bead dangles), and change them to match your outfit.

TECHNIQUE TIP: Hammering the wire is an easy way to harden the wire, which helps to keep it shape. I also like the look of hammered wire. But an alternative is to create the hoops without any hammering, and then throw them in a jewelers tumbler for an hour or so – the tumbling will harden the wires, so that they have a springiness to them.

Have fun…!


Amazing Students!

2 08 2010

This weekend I had a really great class – a great fun project, alot of different wire techniques, beautiful beads, and just absolutely wonderful students!  In my class yesterday at Beaded Bliss (one of my favorite places!),the students created such great projects – I decided that this week I would focus on them, instead of me!

We worked in wire from 12g – 22g gauge, and did alot of design planning. To start, we learned first how to twist wire in different gauges, and then how to make perfectly wrapped coils…

Twisted up and Coiled!

Some folks used silver, but some decided to use copper instead, especially folks who were new to wire working. No one wants to spend big $$ on silver when you’re learning new skills, and aren’t sure how it will come out.

Kuchi, Kuchi, koo!

Once we mastered basic coiling and twisting, we learned how to make Kuchi beads from wrapped wire. I’m not sure where the name “Kuchi” comes from, but that’s what I’ve always heard them called.

Antiquing makes it come to life!

Everyone made up a nice selection of coils and Kuchi’s, and then those wanting to antique them, gave their components a bath with Liver of Sulpher (LOS). I love how copper gets such a rich look from the LOS – it changes the wire from “hardware looking” to jewelry grade!

So what was everyone making….? They combined their wire components with  some beautiful lampwork beads, natural stones, and a variety of metal, bone, glass, and ceramic spacers. And they made these beautiful bangles!

Copper Bangle 1

I love how these beads work together – the copper really works with the colors she chose, and the end result is a beautiful bracelet.

Copper Bangle 2

Aren’t these cool beads? The carnelians have some real unusual patterns, and they are balanced with the cool blue beads, and tied together with the cream accents. Another beautiful bracelet.

Copper Bangle 3

The beads and spacers in this bangle really work well together – the group of spacers next to Kuchi show such a wonderful variety of textures – when they are all together, they become a subtle focus.

Silver Bangle 1

This is a great bangle… the blue beads are amazonite, and they look fabulous with the carnelian and bone beads. The silver work is really well done – the very precise Kuchi and tightly wound coils provide a very clean look. The decision to leave this bright (not antiqued) gives is a wonderful light feel.

Silver Bangle 2

This bangle reminds me of the African Savannah! The colors, and the patterns on the lampwork beads – they look great with the antiqued silver wire, and ever time it moves on the wrist, you see something new – what a different look than the first silver bangle!

Silver Bangle 3

I love the neutral palette of this design… the lampwork beads have a very organic feel, and the green aventurine beads accent them really nicely. I like how the darker beads make the rest of the bangle pop

I never forget that students take classes for a number of reasons – they want to be among people who share their passion, they want to learn how to do something, and they hope to walk away with a new skill… and hopefully a great new piece of jewelry!

I was really thrilled with the amazing pieces everyone created, and I think they were too!


Getting Hooked (or, How to Make a Clasp)

26 07 2010

Being able to make your own jewelry findings means that you can always create what you need, in the size you need. I love finishing off a handmade piece with a well made clasp, and one of my favorites is the basic wire hook.

Step 1: flatten one end

I start with a 2.5 inch length of wire, in a pretty heavy weight. I’m using 16g here, but you can change up the gauge and the length to customize your clasp. Sand or file the ends clean, and hammer one end to create a “paddle” shape.

Step 2: create a small loop

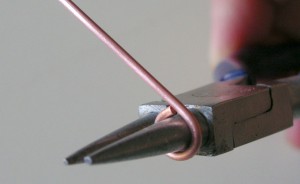
Next, you need to create a small loop (as small as possible) at the flattened end, using the very tip of my round nose pliers.  Make sure you don’t use good precision round nose pliers – the heavier gauge wires could twist the tips out of alignment and ruin your pliers!

Step 3: make a large loop

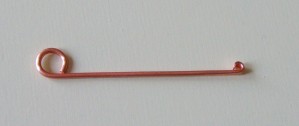
On the other end of the wire, make a larger loop, using the base of your round nose pliers. Make sure that the loops are facing the same direction, as shown below:

The wire is now ready to be shaped

The loops are round, facing the same direction. The wire is nice and straight, and  can now be shaped around a mandrel into a hook (I use a pen in the following steps, but you can use any appropriately shaped rod as a mandrel).

Step 4: holding the wire

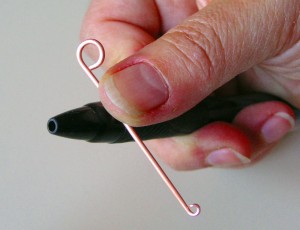
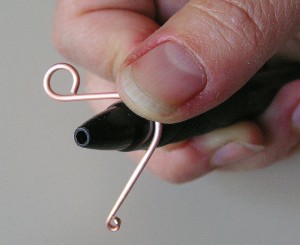
Hold the wire across the top of the pen, with both of the loops facing up. Position your thumb a bit closer to the large loop, and hold the wire tight on the mandrel.

Step 5: bending the wire

Start bending the wire over the mandrel on both sides – the end with the small loop will be longer. Bend the wire gently, ensuring it keeps a rounded shape.

Step 6: shaping the hook

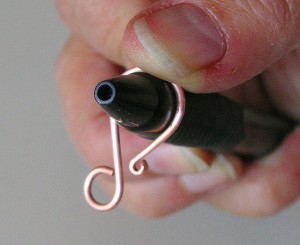
Once both sides are pushed down (like an upside down “U”), push the longer end with the small loop under the mandrel, toward the large loop. This gives the clasp a “swoop” shape, which helps with the integrity of the hook.

Step 7: the finishing touches

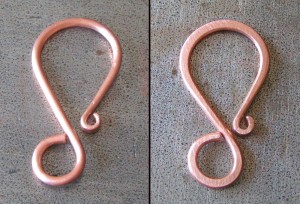
Now the hook is done. The final step is to harden the wire, so that the clasp will not bend out when used. You can either whack it with a mallet, which will keep the wire round (as shown on the left), or you can lightly hammer the wire on the curves, which will result in a clasp as shown on the right. If the curves open up a little, just reshape them closed. And don’t forget to antique your clasp to match your chain and metal components if needed.

Practice a few in copper before working with silver, and adjust the wire gauge and length to create variations that suit your designs and style. You  will never be “held hostage” to store bought components again!


I’ve Been Booked!

18 07 2010

I have a great library of jewelry making books – wirework, metalwork, resin, beading… even polymer clay! I get inspired looking thru them, and I love learning and applying new techniques, and developing my skills.

So I’m thrilled that some of my pieces will be in the gallery section of a new book from Lisa Niven Kelly, the creator of the online Beaducation workshops and website. Lisa is a great designer, and a great teacher, and much of her work involves stamping and cold connections – just my kinda thing!.

Stamped Metal Jewelry by Lisa Niven Kelly

Her new book has some great projects – if you have any interest in metal work, you will love this book! And check out her Beaducation website for videos, tools, metal blanks, design and letter sets – everything you need for stamping projects!

Stamped and Riveted Bangles (StudioDax)

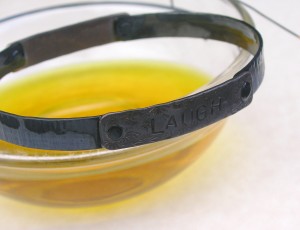
The “LAUGH” bangle above, and a few other similar ones I made, are in the gallery section… I love, love, love, using mixed metals, and rivets are just such a cool design element, in addition to being functional.

"Seek Love" ID Style Bracelet (StudioDax)

The “SEEK LOVE” bracelet is also in the book, at least I think so…. this was a “maybe” so I’ll find out when I get my copy. It’s a favorite of mine, with heavy link chain, Thai Hill silver heart charm, and copper rivet accents… what’s not love?

If you ever get a chance to take one of Lisa’s classes at a bead show, make sure to sign up, you’ll be thrilled with both the skills you pick up, and the project you create!


Adventures in Tumbling

7 07 2010

I’ve been asked by some of my metal work students if  buying a tumbler is a good investment. A tumbler does not polish – if you have scratches, or damage to the surface, it will not remove them. But it will clean and shine up your jewelry so that it looks great, and my tumbler is a tool I would hate to give up. I will do a more in-depth how-to post later on, but this is a quick “before and after” to show what a tumbler can do.

Looking a Little Dull...

So here’s a few of my silver and copper favorites – a couple of  bracelets, some earrings, and a few pendants – stamped, hammered, etched and antiqued. I don’t use any kind of lacquer on my jewelry – I think that silver and copper get a warmer look when worn on the skin.  It’s obvious these pieces are well loved!

The Tumbler Cup

The tumbler uses a rubber cup…. this muffles the noise a little, and buffers the items when turning. I have about a pound and a half of mixed stainless steel shot in the cup along with the jewelry to be cleaned (ALWAYS uses stainless – regular steel will rust easily!).

In the Cup We Have...

Can you see the different shapes of shot in the cup? There are round BBs, saucers, pins, and ovals – the different shapes get into all the nooks in the jewelry once we get started. At this point, I fill the cup with water to about an inch above the level of jewelry, and I give a squirt of Dawn dishwashing detergent. Use the original (not concentrated) blue Dawn – this has been used by designers for years to clean their jewelry!

Ready to Rumble... er, Tumble!

Close up the cap tightly, put it on the tumbler, and plug it in! I love, love, love, love, love, my Lortone tumbler! I can’t imagine trying to go with a cheaper tumbler – this is a workhorse, and will run effortlessly for years.  I leave it going for about an hour, which is all I need to do for a basic cleaning.

Pretty, Shiny Things!

Pour everything out into a plastic colander and rinse. Be very careful when doing this so you don’t drop the shot all over! Dry off your pieces…. and they’re just like new – clean and shiny, and ready to wear again!


I’m a Very Dirty Girl…

26 05 2010

But luckily, there’s always ways to get clean! As anyone who makes jewelry knows, working with metal is dirty work! Soldering, etching, fabrication – all of these make my hands look like they’ve been playing around inside a car engine, and most soaps can’t get them clean. And the ones that CAN clean them up always leave me feeling like sandpaper….

Grease Monkey Soap by Soap Scentsations

And then there’s Grease Monkey! I got this soap from a fellow Etsian – Soap Sensations (I always like to support the handmade community!), and the soap works great. Specifically made to clean you up after you’re doing your messiest, Grease Monkey is a cold processed soap made with natural ingredients, which leaves your skin soft, and has a clean minty scent (nothing wussy here!). And i to make my point, I thought I’d embarrass myself by showing you what I look like when working:

Where Have These Hands Been??

Just a little soldering, a little fabrication, a dip in Liver of Sulpher (LOS – for antiquing), and a bit of metal cleaning with some very fine steel wool – and my hands get pretty nasty looking. Wow – look at those nails… they look so much worse in a close-up!!

And After the Grease Monkey!

But a little Grease Monkey, a little scrubbing with a nail brush, and everything is pink and new! So I guess I clean up pretty good… huh?

So what was I working on that got me so messy? One of my favorite projects – an Initial Pendant, for a friend who is moving, and will be missed…

Bye, Bye Susan...


DIY at Maker Faire

23 05 2010

Yesterday, I spent the afternoon at Maker Faire (see my post last week), a DIY event, focusing on the “build it yourself” mind set, with an eco-friendly emphasis. I was a volunteer at the Metal Art Association of Silicon Valley (MAASV) table – we were there to let folks know what the MAASV was about, and to offer up a simple “make and take” project.

Make & Take Project

Our project was an easy charm/pendant – we provided copper discs and some simple tools, and showed folks how to add texture to metal. It was best a fun kids project, but quite a few adults took the time to make one up too.

Being a “crafty maker” I was interested in all the crafty DIY and vendors – there were informal demos on felting, sewing, knitting, paper crafts, glass bead making, etc. Here’s a few of the crafty vendors I liked:

Sugar Skulls Rock!

Isn’t this adorable? Cute kids and “Day of the Dead” – what a great combo! My favorite items though from the Frogs & Chicks table… the “iPee” caps and “iPoo” onsies!

Knit Geek Pets!

I also liked the “knit geekery” – these knit pets by MisterFunky are perfect for folks who can’t remember to feed or walk the real thing!

Not Your Kids Scooter!

The techno geekery was really amazing – handmade vehicles, rockets, steampunk, musical instruments, electronics projects with lights and sound, and a lot more – something for all, no matter how big (or small) a geek

There were alot of demos and activities for both adults and kids that really give you some different ways of looking at things… if a Maker Fair comes to your neighborhood, I suggest you go and enjoy the day!


I’m Hooked on Wire…

20 05 2010

…And you can be too! Hooked on Wire (aka: HOW) is an annual wire retreat held in the San Fransisco Bay Area – imagine what you can learn by spending three days (Sept 10-12), with some of the top wirework artists in the country!! This year, Lisa Niven Kelly, Dallas Lovett, and Barb Switzer are the fabulous workshop instructors, and I’m thrilled to be joining HOW this year as one of the evening instructors! My project will be a little bit of a break from all the wire working done during the day – you’ll get a chance to play with some metal and create a fun “FAN-tastic” pendant :

What a "FAN-tastic" Pendant!!!

Hooked on Wire is a wonderful opportunity  to expand your skills, meet great people, and have a whole lotta fun! So check out the website for more info on projects and tickets, and plan a mini vacation – you deserve a few days for yourself! This is the 7th year for HOW, and it just gets better and better…!!