A Little Bling Bling

28 02 2011

A Little Bling Goes A Long Way….

It can be tricky to combine the sparkle of crystal with stark metalwork, but if you keep the design sleek and simple, then the materials work together really well. Back in September, I taught a class at Hooked on Wire, and attended a presentation from the Swarovski folks… I got loads of little crystal bits (see my previous post on this HERE),  and finally got around to creating a new design, which I really love!

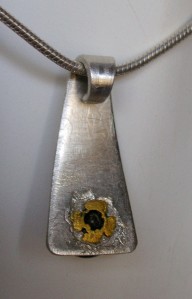
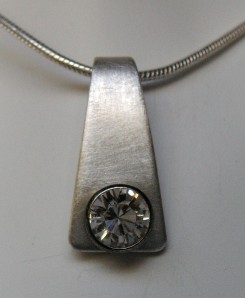
I designed the piece using heavy gauge sterling silver (18g), which I gave a soft matte finish, and added a preset 7mm crystal rivet cup (NOTE: click on photos to enlarge):

Simplicity - Sparkle and Silver

Isn’t this a great look!?! I cut a simple triangle from some scrap silver sheet I had, rounded the edges and the corners, and used a combination of files, sanding blocks, and polishing papers to get the soft finish. I then drilled a hole so I could add the crystal (the crystal comes pre-set in the rivet setting).

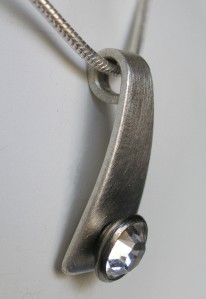
A Modern Style, A Classic Look

From the side view, you can see a bit more detail – when I drilled the hole for the crystal setting, I beveled the edge of the hole to accommodate the angle and allow the cup to seat into the silver. I curved the silver lightly to balance the formed bale – the minimalist shape provides a graceful way to hang the pendant on a chain.

Best Not Seen... The Back!

The back looks a bit messier than it really is… the tube (rivet) was quite long, so I had to cut it’s length, and then cut down the tube to create tabs to fasten it to the silver. Since the rivet is brass, I was concerned that if I manipulated it too much, it would become brittle and crack. So I simply hammered the tabs down, and added a blob of E6000 to cover the tab edges so they don’t catch or scratch (E6000 is a thick adhesive).

Just Hanging Around

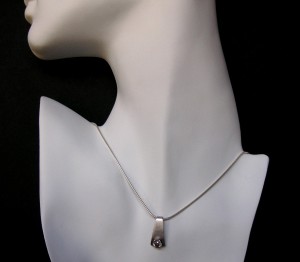
I love how this pendant looks – right at the collarbone, showing on the skin. The crystal makes it pop, and with the matte finish on the silver, this is a piece that looks great jeans and a sweater, or all dressed up – since it’s Swarovski, the quality crystal  sparkles however you wear it!

I gave this one to a friend as a thank you gift, but I’ll be making a few more, maybe even with different shapes, but the same styling. I just love when the end result looks better than what I imagined!


Mistakes Happen

13 12 2010

I enjoy doing custom work – but I hate when I mess it up! A few months ago, I made a simple heart pendant with the name of a friends daughter stamped into the surface. I started in the middle to center the name, and worked outward, but unfortunately, I messed up the next to last letter by stamping it too far away, and not leaving me room for the last letter – so poor “MERCEDES” wound up “ERCEDES” on my first try!

Almost MERCEDES!

I eventually created another one (which came out just fine!), and just threw this into my recycle pile. But I’d much rather reuse, than recycle, so in the back of my mind, I had the idea to rework it with a copper heart, but I wasn’t too sure what to do.

Heart on Heart...

The first thing I realized is that I had to reshape the copper heart to be closer to the shape of the silver one. So I traced the heart, and did a bit of grinding and sanding to make the heart more rounded, like the silver shape.

Shaping My Heart

You can see how I reshaped the bottom to make the sides a bit rounder, and I filed the separation at the top, to exaggerate the shape a little. Once I got the copper done, I needed to do something to the silver, and I decided to do a simple texture using a polished ball pien hammer, working on the back, Once the texture looked good, I laid it on the copper heart, to see how I wanted to proceed.

Two Hearts are Better than One

Not bad…! I really like how the copper base highlights the textured silver, and although I originally thought I’d drill some holes on each side and add jumprings, instead, I think I’ll make a bail in the center. I was also going to rivet the 2 hearts with some brass rod, but I like the solid look of the silver, so I’m going to just solder it up instead.

My Messy Heart!

I did a simple sweat solder join between the 2 pieces by just soldering the back of the silver heart, then laying it over the copper heart, and reheating. Unfortunately, I was concerned that I wasn’t making contact across the whole disk, and I reheated it a bit too much – you can see how the solder flowed out the edges on the sides (sorry I didn’t take a photo before I antiqued it!). I also curved the hearts before soldering them together, so that I didn’t warp the top silver disc, and added a center bail. Then I did a little clean up, oxidized the pendant, and buffed it up with a satin finish.

The Back Counts Too...

When possible, I try to keep the back clean and in the same style as the front – this shows the curve, the patina, and the clean solder of the bail. I only wish the silver heart was as cleanly soldered onto the copper as the bail!

My Heart Belongs to..... Me?

Well… this is not sell quality, but I love the look. So I’m not sure if it’s mine (feels a little strange giving myself a heart!), or if I’ll gift it to a friend. And lucky for me, I’ve got another mis-stamped silver heart in my recycle bin, so I can make another one, which I hope will come out a bit better!!


Oxidizing With LOS

22 11 2010

If you like to create mixed metal jewelry like I do, you’ll soon discover that oxidizing the pieces really give them some depth and enhance the texture. Last week I got an order for a a bangle bracelet that a customer liked, but needed made smaller, so I figured it would be a good time to write up a tutorial on how to use liver of sulpher (LOS) for oxidizing. LOS is great for creating an antiqued look on copper and silver  – it works on brass too, but has a weaker affect.

One Oxidized, One Shiny!

Here is the original bangle, oxidized and “aged” to a beautiful warm patina, shown with the “brand spaking new” bangle I just finished. You can clearly see the difference in the finish – the oxidized bangle (top) has the detailed texture and stamping highlighted, whereas the new one I made doesn’t show the depth.

In Rock Form

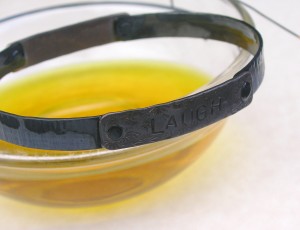
I use the solid LOS – I’ve been using it for years, and I’m pretty used to it, but you can also buy liquid form and gel form, which is easier to use, but has a shorter life span. Solid LOS comes in rocks, and the container is cloudy to protect from direct light. It is very, very, very important to keep LOS stored in a way to keep moisture from getting into the container – moisture will make LOS useless. I always tighten my container, put it in a ziplock bag, and place that into a brown bag – protecting it from light, and moisture. To use, I take a small rock, and put it into a glass bowl, then add very hot water.

Dissolved...

Make sure not to use a metal bowl or it will contaminate the solution, and mess up the bowl too!  The LOS will dissolve in the hot water, becoming a greenish yellow color. Please note – LOS is a chemical – it STINKS like sulpher (duh…), and some folks are sensitive to it. I don’t have any issues, but I try to keep it off my skin, and use a piece of copper wire as a hook to dip items into the LOS.

Like Magic!

I just drop the bangle in, and very quickly, the bangle turns black. It only takes a few seconds (really!) to completely change the copper and silver. I always make sure that I use a copper hook, so I don’t need to fish it out with my fingers!

...And 10 Seconds Later...!

Once I get the coverage I want, I remove the piece and rinse it in cold water. You want to be sure that you don’t leave it in the LOS too long, because if you “over” oxidize, the black will actually solidify, and flake off. The LOS will continue to work in heat, so it is important to rinse in cold water, and dry completely.

Yuck!!

You can really see how black it gets when you compare the bangles! It’s hard to believe, but in just 15 minutes, these bangles will look like twins! But to get there, we need to get down and dirty…

Take it off, take it off, take it all off!!

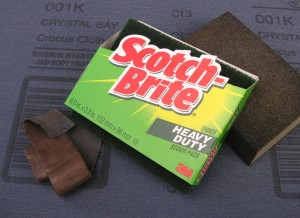
There are several different ways to remove the excess surface black. Basically, you need to gently scratch it off, to expose the surface underneath. These are the three products I used for this bangle: 3M Scotch-Bright green scrubbies (for some reson, generic scrubbies just don’t work!), a fine sanding sponge block (you can get these from the hardware store), and 3M Crocus Cloth, which I get from jewelry suppliers. First I use the green scrubbie  and rub it over the surface, getting as much black off as I can. The sanding block can be a bit scratchy on the surface, so make sure to practice using this on scrap metal to get used to it. I also use the green scrubbie to get the inside cleaned up, and then I use a strip of the crocus cloth to buff it up and soften any scratches. Crocus cloth is a denim material with a fine sandpaper paint on one side. It will dissolve and make a big mess if it gets wet, so make sure your piece is dry.

Just like the other one!

And here’s the final “twin bangles” – the original is on the bottom (you can see the word “DREAM” on the inside back), and the new one is up top. It is still a little bright – it will take a few days for the copper “pink” to age and take on a beautiful warm color. I will rub a little oil onto the surface, which protects the piece a bit, and adds to the patina. Over time, the new owner will need to occasionally rub  the piece clean with a green scrubbie, because the copper will continue to oxidize naturally.

I rarely make 2 items like this EXACTLY the same. I usually stamp a different phrase or texture, so this was a great chance to compare all the steps in the process with the final bangle. I hope this helped to show folks that using LOS is pretty easy, and the results are great!


Gotta Have It… Soldering

8 11 2010

Wanna Solder??

People are always looking to add to their skillset – learning new techniques is how we expand and grow our craft. And the one area that jewelry designers always have concerns with is soldering:

  • “It’s too complicated”
  • “It cost’s too much”
  • “It takes up too much room
  • ‘I’m afraid I’ll burn the house down”

These are the basics that most people come up with. So I’m going to write a few posts explaining soldering in a “real” environment – mine! This first post will look at the tools you need, and later on, I’ll post more about the techniques and how-tos.

Not as Much Space as You Thought!

I have a very, very, very, small workspace – it’s actually in a closet! So I am very careful about what I buy, making sure it is absolutely necessary. And this photo shows the items you absolutely must have to get started: You can see the can of butane (the fuel) and to the right of that is the mini torch (aka: creme brule torch). Behind the torch, you’ll see a small crockpot – this is my “pickle” pot, where I keep the pickle, which is an acid used to clean up metal after soldering. To the right of the torch, on the worktop, is copper tongs (use these when removing a piece from the pickle pot), some tweezers and pics, and tubes of solder paste. I use solder paste because it mixes the solder with the flux (a solution used to help solder flow), and in a small space, I prefer to make it as simple as possible! There is a small tripod, which has a screen laying across the top, and a charcoal block on top of that:

On the Block

The tripod is great for raising your pieces to working level, the screen is both a working surface (useful when you want to torch the piece from underneath), as well as a shelf for the charcoal bloack. I like to solder on compressed charcoal, because it holds the heat from the flame, making it easier to get your piece to come to soldering temperature. As you can see – it can get pretty messy and ashy, but it still works fine. I occasionally rub the surface of the block to even out the surface and make it flat.

This is really it – a torch, the fuel, solder/flux, something to solder on, tweezers to move and pick up the item as it heats up, and pickle to clean off the firescale.

When 2 Hands Aren't Enough

Another item that is handy (but not necessary!) is a 3rd hand, used to hold an item in position. In this photo, the ring is being held firmly on a square of silver so it doesn’t shift when the torch is applied.

Not as complicated as you thought…. and this set-up is perfectly fine to get started. I have been soldering for many years, but my space is limited (a closet – remember!), so I cannot have a more elaborate set-up. And this simple set-up is sufficient for almost all the work I want to do.

In my next Soldering post, I’ll explain more about the tools and materials, and in future posts, I’ll show how to set up your projects for basic soldering techniques.


Bye, Bye, Halloween!

31 10 2010

The Halloween Season is Over!

My very favorite Halloween activity is watching the special Halloween themed sitcom marathons…. especially the episodes of “Roseanne” – no one does it any better! And now, before we start the massive end of the year retail blitz, I’d like to say goodbye to Halloween, and show off my favorite holiday projects:

Eeeek! Caught in My Web!

A little web, and a little sparkle – this crystal “spider” always gets noticed. I was so disappointed that this class never got filled – maybe I’m the only one who thinks it’s cool???

Bat with a Heart On!

Yeah…. I know, but really, what else could I name this piece?? I love etching, and  always have great fun teaching it… next year I’m gonna have to get more of these bats!

Blood Lust... Bite Me!

It could be True Blood, or maybe it’s Twilight, but all of a sudden “Bite Me” means something totally different than I remember…! I always love wearing stamped saying pendants (mine says “Runs with Scissors”), and this one seems to be pretty popular….  I’m thinking as long as movies and books are focusing on fangs, this will remain a favorite!

So it’s time to put the spiders and bats away – Hannuka Harry and Santa Claus wanna come out and play!


When Mistakes Work

11 10 2010

Do What I Say…. Not What I Do!

This weekend I taught a fun new class which combined basic metal work with stamping and soldering, to create a personalized heavy gauge ring. I don’t always get to create a complete project in class, because I am focused on working with my students, but for this project, I had to demo every step, so I was able to make a ring of my own.

Caffeine.... Sorta!

So I decided that the chemical compound for CAFFEINE  (C8H10N4O2) would be kinda cool. I showed the class how to line up the letters, and I even told them that they need to watch for the direction of the stamp, so that no letters were upside down. So what do I do?! I proceed to stamp the “O” sideways… obviously I needed a little bit more coffee before class started!

So this became a lesson in “organic design” – sometimes you just need to accept your design, flaws and all, and love the uniqueness of what you create. And… the class decided that my representation showed a quirkiness that works!

Letter Stamps

Some letter stamps come with a scratch, or a mark on them, indicating the side that faces you when stamping, so that the letters line up correctly (example above left). The stamp set I used for my C8H10N4O2 ring didn’t have any markings, so basically you need to check each letter before stamping. Obviously, I got it wrong!

A simple tip… if your letter set does not have any directional indicators on them, then I suggest marking it yourself. I use a little nail polish (example above center) which shows up and withstands a bit of abuse. Because if you leave your stamps plain, like the one in the photo above right, you will surely create some “organic” designs yourself!


What’s the Hoopla over Hoops??

5 10 2010

Like many women, I loooove hoops! I make quite a few, in different shapes and weights, and although some designs can get a bit complex, the basic “one piece of wire”  hoop style is quite easy to make. It’s been a while since I posted a new tutorial (sorry!), so tonight it’s a “how-to” on making hoops! You’ll need the basic jewelry tools (chain nose pliers, cutters, and round nose pliers), as well as some metal smithing tools (steel block, chasing hammer, and a steel ring mandrel). But if you don’t have all of the metal smithing tools items, you can still practice all the basic steps without hammering…

How to grasp the wire

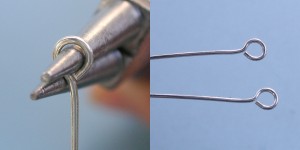
First, we cut 2 pieces of 20g dead soft round wire, each 3 1/4 inch long, and file/sand the ends flus. For reference, I am using sterling silver wire (plated wires may get damaged, but copper works great). Next, we will create a small, centered loop on one end of each wire. Start by grasping the wire between the jaws of the round nose pliers – note how the wire is flush, and doesn’t stick up!

TECHNIQUE TIP: The closer the wire is to the tip of the pliers, the smaller the loop.

Rotate the wire - create the loop

Now, while holding the pliers firm, rotate the wire around one of the jaws to create a loop. If the loop doesn’t close, just reposition it, and pull the wire until you get a nice closed loop. Repeat with the second wire, making sure they look the same.

Centering the loop

Now we need to center the loop over the wire. The easiest way to do this is to grasp the wire with the round nose pliers, so that the wire is hanging down between the jaws, and then gently pushing the wire back, which will reposition the loop and bring it to the center. If the loop opens up, just adjust it a bit…. this takes a little fiddling with, so just be gentle and keep at it until it looks right!

Flatten the loops.... a little bit!

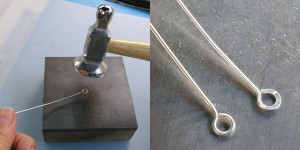
Wire is pretty malleable, and we need to harden the loops up a bit to keep them from opening. An easy way to do this is to lightly hammer them, using a chasing hammer on a steel block. The photo above on the right shows how hammering the loop lightly will flatten the wire, and change it’s appearance a little. The wire on the left has not yet been hammered, so you can see the difference. If needed, close up the loop – hammering will open it up a little.

Shaping the hoops

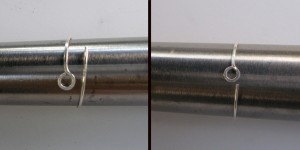
Now comes the part where they actually start to look like earrings! Start by wrapping the wire around a small end of the ring mandrel, and then sliding it down until the ends just meet. This way, the wire hugs the mandrel – if you start out wrapping it at the larger end, the wire springs open a bit, and you may not get the hoop to close. If you don’t have a ring mandrel, you can wrap the wire around anything that is the right size – a fat marker, a bottle top, or a pool cue make good alternatives.

Hardening the hoops

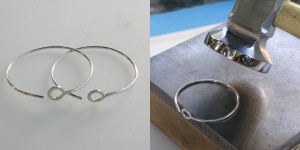
We’re almost done! Lightly hammering the hoops will harden them, so that when we open and close them, they spring back to shape. Make sure to position the loop over the side, and leave about 1/2 inch from each end unhammered. The hoops may get a little out of shape from the hammering – that’s ok – we will get them back in shape!

Finishing them up

The hoops look pretty good, but we need to finish them by making the earring “catch” which fits into the loops to keep them from falling off. Using chain nose pliers (I am using bent chain nose, but any flat pliers will work), bend up the end sharply  – about  1/8 inch.

Final touches

If needed, close up the hoops, and slide them back over the mandrel – this will make them nice and round, and ready to wear. You can easily add additional charms or bead drops (I added some raw faceted citrine bead dangles), and change them to match your outfit.

TECHNIQUE TIP: Hammering the wire is an easy way to harden the wire, which helps to keep it shape. I also like the look of hammered wire. But an alternative is to create the hoops without any hammering, and then throw them in a jewelers tumbler for an hour or so – the tumbling will harden the wires, so that they have a springiness to them.

Have fun…!


Sparkly, Shiny, Things!

15 09 2010

Ohhhhh…. Swarovski!

If you look at my jewelry, you’ll notice that my style leans toward natural, organic styles. And even though most of my jewley just doesn’t work with them, it doesn’t stop me from wanting to play with sparkly shiny things! So last week at Hooked on Wire, I was just as excited as everyone else to see the presentation from the Swarovski rep, and check out all the new products coming out. There were various crystal items strewn all over the tables to keep us in our seats! And even more fun, at the end of the presentation, WE GOT TO SWEEP UP THE TABLES!

Shiny Goodies!!

So look at what I got…! I have no designs in mind for what I’ll be doing with these, but I just couldn’t help myself – I wanted them, so I took’em!! Most of these will need to be set with prongs, like faceted gemstones, but some are flat backed, like the fabulous blue checkerboard crystal. Some styles have rivet backings, that require the use of a special setting tool to prevent the crystal from breaking. But I don’t have the special setting tool, so I had to see if my riveting skills would be good enough…

Silver Petals with Crystal Rivets

Aren’t these just so cute!? These crystals are only 4mm each (less than 1/4 inch), but they have a really great shine. They are pre-set in small brass multi-prong rivet seats, which makes them easy to use… ok, not real easy, but since I’ve been riveting tubes for a few years, I guess my riveting skills were just fine!

Side View Close-up

These look so cool from the side – the textured sterling petals (5/8 inch) are curved, creating a basin for the crystals. The brass seat has a cone shape, which holds the crystal up… I like that it gives it a more dimensional look.

Side View of the Crystal Rivet

At this angle, you can see the bottom a little. The brass seat includes a short tube, which was set in a hole in the silver, and then flared to hold the crystal tight. It’s a little tricky to flare the rivet without breaking the crystal, but I was able to get it done by going slow. The result is a very sweet pair of earrings. They measure less than an inch total, but they have a brilliant sparkle!


Amazing Students!

2 08 2010

This weekend I had a really great class – a great fun project, alot of different wire techniques, beautiful beads, and just absolutely wonderful students!  In my class yesterday at Beaded Bliss (one of my favorite places!),the students created such great projects – I decided that this week I would focus on them, instead of me!

We worked in wire from 12g – 22g gauge, and did alot of design planning. To start, we learned first how to twist wire in different gauges, and then how to make perfectly wrapped coils…

Twisted up and Coiled!

Some folks used silver, but some decided to use copper instead, especially folks who were new to wire working. No one wants to spend big $$ on silver when you’re learning new skills, and aren’t sure how it will come out.

Kuchi, Kuchi, koo!

Once we mastered basic coiling and twisting, we learned how to make Kuchi beads from wrapped wire. I’m not sure where the name “Kuchi” comes from, but that’s what I’ve always heard them called.

Antiquing makes it come to life!

Everyone made up a nice selection of coils and Kuchi’s, and then those wanting to antique them, gave their components a bath with Liver of Sulpher (LOS). I love how copper gets such a rich look from the LOS – it changes the wire from “hardware looking” to jewelry grade!

So what was everyone making….? They combined their wire components with  some beautiful lampwork beads, natural stones, and a variety of metal, bone, glass, and ceramic spacers. And they made these beautiful bangles!

Copper Bangle 1

I love how these beads work together – the copper really works with the colors she chose, and the end result is a beautiful bracelet.

Copper Bangle 2

Aren’t these cool beads? The carnelians have some real unusual patterns, and they are balanced with the cool blue beads, and tied together with the cream accents. Another beautiful bracelet.

Copper Bangle 3

The beads and spacers in this bangle really work well together – the group of spacers next to Kuchi show such a wonderful variety of textures – when they are all together, they become a subtle focus.

Silver Bangle 1

This is a great bangle… the blue beads are amazonite, and they look fabulous with the carnelian and bone beads. The silver work is really well done – the very precise Kuchi and tightly wound coils provide a very clean look. The decision to leave this bright (not antiqued) gives is a wonderful light feel.

Silver Bangle 2

This bangle reminds me of the African Savannah! The colors, and the patterns on the lampwork beads – they look great with the antiqued silver wire, and ever time it moves on the wrist, you see something new – what a different look than the first silver bangle!

Silver Bangle 3

I love the neutral palette of this design… the lampwork beads have a very organic feel, and the green aventurine beads accent them really nicely. I like how the darker beads make the rest of the bangle pop

I never forget that students take classes for a number of reasons – they want to be among people who share their passion, they want to learn how to do something, and they hope to walk away with a new skill… and hopefully a great new piece of jewelry!

I was really thrilled with the amazing pieces everyone created, and I think they were too!


Getting Hooked (or, How to Make a Clasp)

26 07 2010

Being able to make your own jewelry findings means that you can always create what you need, in the size you need. I love finishing off a handmade piece with a well made clasp, and one of my favorites is the basic wire hook.

Step 1: flatten one end

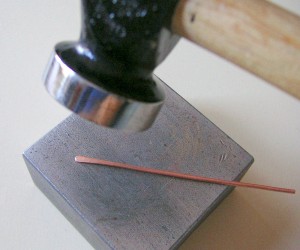
I start with a 2.5 inch length of wire, in a pretty heavy weight. I’m using 16g here, but you can change up the gauge and the length to customize your clasp. Sand or file the ends clean, and hammer one end to create a “paddle” shape.

Step 2: create a small loop

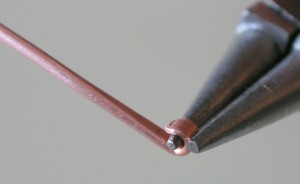
Next, you need to create a small loop (as small as possible) at the flattened end, using the very tip of my round nose pliers.  Make sure you don’t use good precision round nose pliers – the heavier gauge wires could twist the tips out of alignment and ruin your pliers!

Step 3: make a large loop

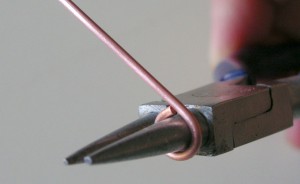
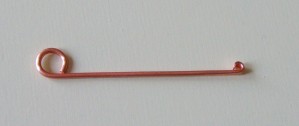
On the other end of the wire, make a larger loop, using the base of your round nose pliers. Make sure that the loops are facing the same direction, as shown below:

The wire is now ready to be shaped

The loops are round, facing the same direction. The wire is nice and straight, and  can now be shaped around a mandrel into a hook (I use a pen in the following steps, but you can use any appropriately shaped rod as a mandrel).

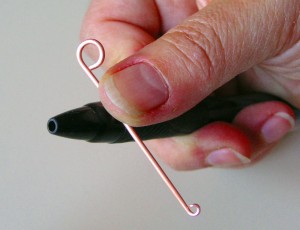
Step 4: holding the wire

Hold the wire across the top of the pen, with both of the loops facing up. Position your thumb a bit closer to the large loop, and hold the wire tight on the mandrel.

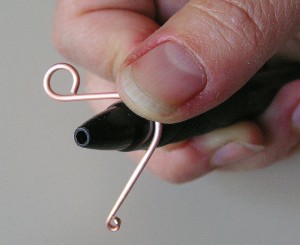
Step 5: bending the wire

Start bending the wire over the mandrel on both sides – the end with the small loop will be longer. Bend the wire gently, ensuring it keeps a rounded shape.

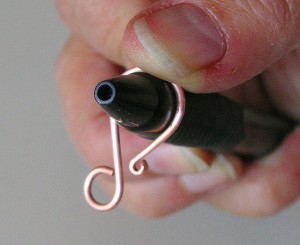
Step 6: shaping the hook

Once both sides are pushed down (like an upside down “U”), push the longer end with the small loop under the mandrel, toward the large loop. This gives the clasp a “swoop” shape, which helps with the integrity of the hook.

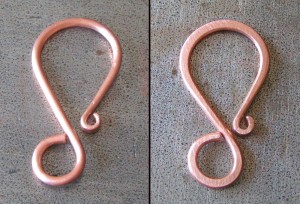
Step 7: the finishing touches

Now the hook is done. The final step is to harden the wire, so that the clasp will not bend out when used. You can either whack it with a mallet, which will keep the wire round (as shown on the left), or you can lightly hammer the wire on the curves, which will result in a clasp as shown on the right. If the curves open up a little, just reshape them closed. And don’t forget to antique your clasp to match your chain and metal components if needed.

Practice a few in copper before working with silver, and adjust the wire gauge and length to create variations that suit your designs and style. You  will never be “held hostage” to store bought components again!