Bye, Bye, Halloween!

31 10 2010

The Halloween Season is Over!

My very favorite Halloween activity is watching the special Halloween themed sitcom marathons…. especially the episodes of “Roseanne” – no one does it any better! And now, before we start the massive end of the year retail blitz, I’d like to say goodbye to Halloween, and show off my favorite holiday projects:

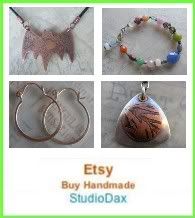
Eeeek! Caught in My Web!

A little web, and a little sparkle – this crystal “spider” always gets noticed. I was so disappointed that this class never got filled – maybe I’m the only one who thinks it’s cool???

Bat with a Heart On!

Yeah…. I know, but really, what else could I name this piece?? I love etching, and  always have great fun teaching it… next year I’m gonna have to get more of these bats!

Blood Lust... Bite Me!

It could be True Blood, or maybe it’s Twilight, but all of a sudden “Bite Me” means something totally different than I remember…! I always love wearing stamped saying pendants (mine says “Runs with Scissors”), and this one seems to be pretty popular….  I’m thinking as long as movies and books are focusing on fangs, this will remain a favorite!

So it’s time to put the spiders and bats away – Hannuka Harry and Santa Claus wanna come out and play!


Support Your Local Shop!

30 10 2010

As a jewelry designer and teacher, I buy alot of my supplies wholesale – thru gem shows, thru online sources, thru major distributors, and thru a multitude of small sellers I’ve established ongoing relationships with over the years. I buy large quantities, and multiples of the same items, enabling me to get good prices so I can create and sell my jewelry competitively, and so that I can make available tools and quality materials to my students.

But… I also buy at my local bead shop and lapidary. My local shops are my bloodline – they allow me to buy small quantities when I don’t need alot, they let me see and touch the beads, and I can check out the colors and match things, knowing that what I see is what I get. They provide instant gratification!

They provide a place where I can teach, and where I can learn. And the people that own and work in these shops have invaluable knowledge and they share my passion.

Goodbye, Julie, Goodbye Beaded Bliss!

Sadly, one of my favorite shops closed today… Beaded Bliss in Danville. Julie created a shop that was warm, and friendly, and knowledgeable, and I loved teaching my classes there. My students have been enthusiastic and talented, and I am so very sorry that this wonderful shop has closed.

So my plea today …. please remember your local shop. No matter what you craft is, the community of like-minded people is so very important in building creativity and sharing ideas.  So please, stop by a local shop near you, and get to know them!


When Mistakes Work

11 10 2010

Do What I Say…. Not What I Do!

This weekend I taught a fun new class which combined basic metal work with stamping and soldering, to create a personalized heavy gauge ring. I don’t always get to create a complete project in class, because I am focused on working with my students, but for this project, I had to demo every step, so I was able to make a ring of my own.

Caffeine.... Sorta!

So I decided that the chemical compound for CAFFEINE  (C8H10N4O2) would be kinda cool. I showed the class how to line up the letters, and I even told them that they need to watch for the direction of the stamp, so that no letters were upside down. So what do I do?! I proceed to stamp the “O” sideways… obviously I needed a little bit more coffee before class started!

So this became a lesson in “organic design” – sometimes you just need to accept your design, flaws and all, and love the uniqueness of what you create. And… the class decided that my representation showed a quirkiness that works!

Letter Stamps

Some letter stamps come with a scratch, or a mark on them, indicating the side that faces you when stamping, so that the letters line up correctly (example above left). The stamp set I used for my C8H10N4O2 ring didn’t have any markings, so basically you need to check each letter before stamping. Obviously, I got it wrong!

A simple tip… if your letter set does not have any directional indicators on them, then I suggest marking it yourself. I use a little nail polish (example above center) which shows up and withstands a bit of abuse. Because if you leave your stamps plain, like the one in the photo above right, you will surely create some “organic” designs yourself!


What’s the Hoopla over Hoops??

5 10 2010

Like many women, I loooove hoops! I make quite a few, in different shapes and weights, and although some designs can get a bit complex, the basic “one piece of wire”  hoop style is quite easy to make. It’s been a while since I posted a new tutorial (sorry!), so tonight it’s a “how-to” on making hoops! You’ll need the basic jewelry tools (chain nose pliers, cutters, and round nose pliers), as well as some metal smithing tools (steel block, chasing hammer, and a steel ring mandrel). But if you don’t have all of the metal smithing tools items, you can still practice all the basic steps without hammering…

How to grasp the wire

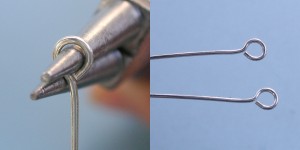
First, we cut 2 pieces of 20g dead soft round wire, each 3 1/4 inch long, and file/sand the ends flus. For reference, I am using sterling silver wire (plated wires may get damaged, but copper works great). Next, we will create a small, centered loop on one end of each wire. Start by grasping the wire between the jaws of the round nose pliers – note how the wire is flush, and doesn’t stick up!

TECHNIQUE TIP: The closer the wire is to the tip of the pliers, the smaller the loop.

Rotate the wire - create the loop

Now, while holding the pliers firm, rotate the wire around one of the jaws to create a loop. If the loop doesn’t close, just reposition it, and pull the wire until you get a nice closed loop. Repeat with the second wire, making sure they look the same.
Centering the loop

Now we need to center the loop over the wire. The easiest way to do this is to grasp the wire with the round nose pliers, so that the wire is hanging down between the jaws, and then gently pushing the wire back, which will reposition the loop and bring it to the center. If the loop opens up, just adjust it a bit…. this takes a little fiddling with, so just be gentle and keep at it until it looks right!
Flatten the loops.... a little bit!

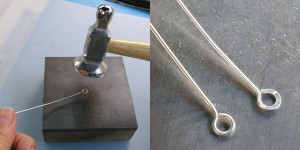
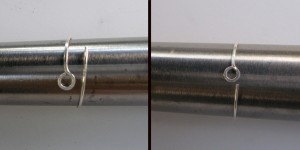
Wire is pretty malleable, and we need to harden the loops up a bit to keep them from opening. An easy way to do this is to lightly hammer them, using a chasing hammer on a steel block. The photo above on the right shows how hammering the loop lightly will flatten the wire, and change it’s appearance a little. The wire on the left has not yet been hammered, so you can see the difference. If needed, close up the loop – hammering will open it up a little.
Shaping the hoops

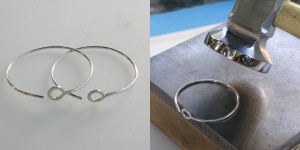
Now comes the part where they actually start to look like earrings! Start by wrapping the wire around a small end of the ring mandrel, and then sliding it down until the ends just meet. This way, the wire hugs the mandrel – if you start out wrapping it at the larger end, the wire springs open a bit, and you may not get the hoop to close. If you don’t have a ring mandrel, you can wrap the wire around anything that is the right size – a fat marker, a bottle top, or a pool cue make good alternatives.
Hardening the hoops

We’re almost done! Lightly hammering the hoops will harden them, so that when we open and close them, they spring back to shape. Make sure to position the loop over the side, and leave about 1/2 inch from each end unhammered. The hoops may get a little out of shape from the hammering – that’s ok – we will get them back in shape!

Finishing them up

The hoops look pretty good, but we need to finish them by making the earring “catch” which fits into the loops to keep them from falling off. Using chain nose pliers (I am using bent chain nose, but any flat pliers will work), bend up the end sharply  – about  1/8 inch.

Final touches

If needed, close up the hoops, and slide them back over the mandrel – this will make them nice and round, and ready to wear. You can easily add additional charms or bead drops (I added some raw faceted citrine bead dangles), and change them to match your outfit.

TECHNIQUE TIP: Hammering the wire is an easy way to harden the wire, which helps to keep it shape. I also like the look of hammered wire. But an alternative is to create the hoops without any hammering, and then throw them in a jewelers tumbler for an hour or so – the tumbling will harden the wires, so that they have a springiness to them.

Have fun…!